Advanced AVIUtl Procedures
Load your AVI by pressing Control - O and selecting an AVI. The select File - Save AVI.
 Check
No recompress for both audio and video and enter Title, Comment and Copyright,
then save the AVI.
Check
No recompress for both audio and video and enter Title, Comment and Copyright,
then save the AVI.
>> BACK
AVIUtl is the only program I know that allows you to set keyframes at desired positions - preferably at scene changes. To do so use the slider and buttons at the bottoms to move around in your movie, then press Control-K at the frame you want to make a keyframe.
![]()
Then when you've set the all the keyframes you might want to save your work, and not only the AVI but to save the keyframe settings so that you can swap them with your friends. The corresponding options can be found in the file menu once again.
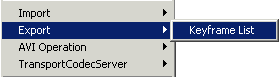
Simply select Export - Key Frame List or if you want to import a Keyframe List select Import - Keyframe List.
>> BACK
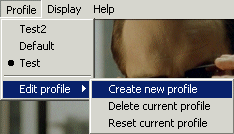
A profile can be really useful when you're working on a large project but have to pause the operation at a certain point. AVIUtl allows you to save all your work using the Profiles menu.
 To
create a new profile simply select Create new Profile and you'll be prompted
for a name. Now, all your current settings can be accesses by selecting
your new profile in the Profiles menu. Alternatively you can reset or
delete a profile again.
To
create a new profile simply select Create new Profile and you'll be prompted
for a name. Now, all your current settings can be accesses by selecting
your new profile in the Profiles menu. Alternatively you can reset or
delete a profile again.
>> BACK
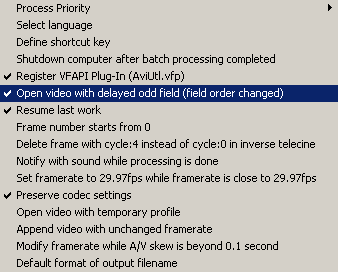
The general settings in AVIUtl are pretty well hidden but you've already made contact with them in any case (unless you speak Japanese and have not bothered to change the language). The Settings menu can be accessed via the file menu, it's the 2nd option from the bottom.
 By
default only the Register VFAPI Plug-In option will be activated. You
might want AVIUtl to save your last project so check Resume last work.
You can also change the frame numbering to start with zero rather than
one. Another nice thing is Preserve codec settings which will remember
the audio and video codec settings. If the video should look really shitty
you can select Open video with delayed odd field which will effectively
change the field order.
By
default only the Register VFAPI Plug-In option will be activated. You
might want AVIUtl to save your last project so check Resume last work.
You can also change the frame numbering to start with zero rather than
one. Another nice thing is Preserve codec settings which will remember
the audio and video codec settings. If the video should look really shitty
you can select Open video with delayed odd field which will effectively
change the field order.
Last but not least there's the Modify framerate while A/V
skew is beyond 0.1 second where AVIUtl will try to prevent asynch movies
(and hopefully succeed).
>> BACK
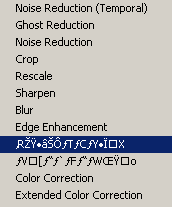
Simply select the bicubic resizing filter in the settings menu.
 Simply
select the first filter which meaning you'll most likely not understand
;)
Simply
select the first filter which meaning you'll most likely not understand
;)
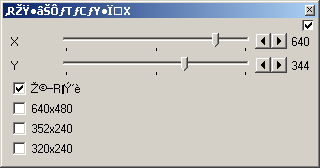
The configuration dialog is also easy to understand.
 The
undecypherable letters besides the first checkbox means custom. You can
activate the filter by checking the checkbox on the top right and use
the sliders to set the size.
The
undecypherable letters besides the first checkbox means custom. You can
activate the filter by checking the checkbox on the top right and use
the sliders to set the size.
>> BACK
Load your input file as usual (Control-O) but check read as 60fps in the load dialog:

Now use the slider to forward a bit in the movie should it start with a black screen, then press on the frame advance button (the 2nd one from the left of the 4 buttons at the right bottom of the main AviUtl window). Don't worry about interlacing, that's normal at this position. Keep the button pressed and watch the movie slowly advance. If the field order is right the motion is smooth, if not you'll see a couple of fields, then suddenly the movie seems to hop back a couple of fields and the same field will be shown again. Maybe a couple of screenshots would help to illustrate it even better but for bandwith reasons I prefer not to. You'll definitely see it... it looks like something is simply wrong in the video. If that should be the case you can change the field order by selecting File - Preferences and then check Open video with delayed odd field.
 Then
load the input file again, again with read as 60fps checked and check
if the motion is now smooth. Then load the input file yet again but this
time don't check any of the options.
Then
load the input file again, again with read as 60fps checked and check
if the motion is now smooth. Then load the input file yet again but this
time don't check any of the options.
>> BACK