VobSub & SSA Guide
Important: This method is recompressing the video. Therefore it's a good idea to chose either a very high bitrate for the DivX codec when doing the initial compression in whatever program you prefer, and just to reduce to the desired bitrate when adding subtitles, or you can use another format which won't compress the movie as much as DivX does. It's a good idea not to crop the video when using that method, since otherwise you'll have subtitles overlayed over the movie. Take a look at this before you crop if you want to use this method.
There's in fact 2 methods, once is using VobSub as described below and the other is using the SSA Subtitle Plugin. You'll have to simply copy the .vdf file into the VirtualDub/plugins folder.
>> Read more about
SSA
Also, this is quite a time-consuming method and I don't really have enough experience with this method to post a guide but I decided to mention it anyways. Also.. .the creator of this program mentioned that there might be some issues with NTSC movie, like subtitles not being displayed at the right place or so.
Of course - and as always - you'll need the ripped vob files on your hard disk. You'll also need the vts_0X_0.ifo file located on your DVD drive. You'll need the ifo file corresponding to the main movie, so if you have ripped vts_05_1.vob up to vts_05_5.vob you'll need vts_05_0.ifo. Ifo files contain information about when to display subtitles, chapter information and other navigational info - for instance the infamous multiangle stuff is stored there, too. If you have all the necessary files it's time to start VirtualDub.
Pressing Control-F in VirtualDub will open the following window
 This
simple dialog represents the most powerful features of VirtualDub. Read
the Help Files to find out more about Filters in general. Click Add..
This
simple dialog represents the most powerful features of VirtualDub. Read
the Help Files to find out more about Filters in general. Click Add..
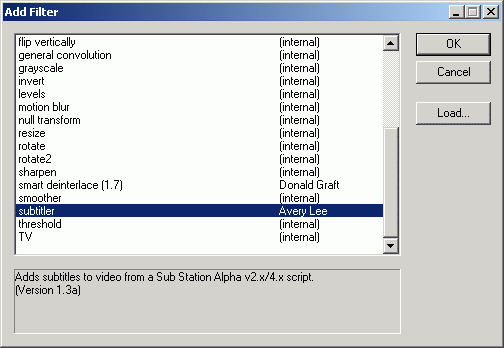
 Here
you can see what filters VirtualDub has in store for you. There's a lot
you can do in VirtualDub... If VobSub 1.21 is not being shown, click Load,
then select the vobsub.vdf file out of the VobSub package. Select the filter
and press ok. The following configuration window will pop up:
Here
you can see what filters VirtualDub has in store for you. There's a lot
you can do in VirtualDub... If VobSub 1.21 is not being shown, click Load,
then select the vobsub.vdf file out of the VobSub package. Select the filter
and press ok. The following configuration window will pop up: Press
Open and select the IFO corresponding to your movie. After it the index
has been created, select the language of the subtitles. You can also set
custom colors, otherwise the colors specified on the DVD will be used. Then
click ok, and ok again to get back to the main VirtualDub window. You can
also move the position of the subtitles using the buttons on the right on
the side and below the red square, just try some options if you're not happy
with the result.
Press
Open and select the IFO corresponding to your movie. After it the index
has been created, select the language of the subtitles. You can also set
custom colors, otherwise the colors specified on the DVD will be used. Then
click ok, and ok again to get back to the main VirtualDub window. You can
also move the position of the subtitles using the buttons on the right on
the side and below the red square, just try some options if you're not happy
with the result.Then load your ripped movie into VirtualDub - Control O - Set Audio to Direct Stream Copy and Avi Audio, Video to Full processing mode. This means we're going to recompress the whole movie and this takes a lot of time, also it reduces image quality. Press Control - C to go to the compression options.
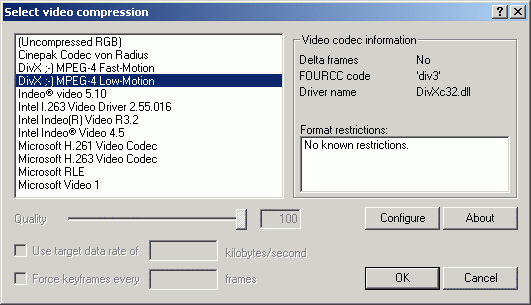 Chose
Configure and configure the DivX codec like you're used to do. If you
don't remember how to do that, go back to one of the ripping
guides.
Chose
Configure and configure the DivX codec like you're used to do. If you
don't remember how to do that, go back to one of the ripping
guides.
If you've set up everything, press F7 to save the video or set up a frameserver if you're not encoding to DivX. As mentioned above the video gets recompressed so it'll take a really long time - several hours in any case. Here's the output window of VirtualDub during the process. The subtitles are obviously wrong, but I didn't have the right VOBs read on my harddisk so please forgive me..

In the end you'll have video with Subtitles burned in that can be played in Media Player or any other DivX capable player.
>>Read more about
VIRTUALDUB FRAMESERVING
>> BACK
SSA Scripts
Step 1: Rip the subtitles
Proceed as described in the subtitle guide (step1).
Step 2: Convert the subtitles to SSA format
Get SSA Script converter.
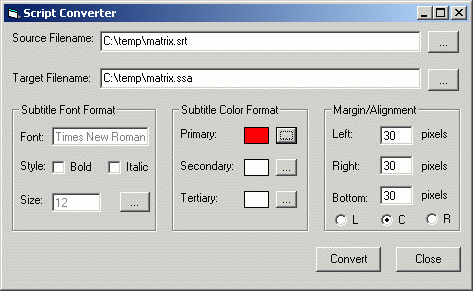 Load
your srt file and chose a filename for the output file. Pressing the ...
button in the Subtitle Font Format section will allow you to set a font
and it's size. You can also set the color of your subtitles and adjust
the alignment. If you're happy with your settings press Convert.
Load
your srt file and chose a filename for the output file. Pressing the ...
button in the Subtitle Font Format section will allow you to set a font
and it's size. You can also set the color of your subtitles and adjust
the alignment. If you're happy with your settings press Convert.
Alternatively you can get srt2ssa.exe.
This is a command line tool! You can run it as follows: srt2ssa inputfile.srt
outputfile.ssa. After that you may want to modify the ssa file, use other
fonts, make the fonts larger/smaller, change color, etc. To do so you
must get Sub Station Alpha.
This guide will not cover the use of that particular program so any questions
regarding it's use should be directed directly at the contacts given at
the aforementioned page.
Step 3: Add the subtitles.
Start VirtualDub and load your AVI file. Then select CRTL-F, and press the Add button. Select the Subtitle filter.
This will open the following window:
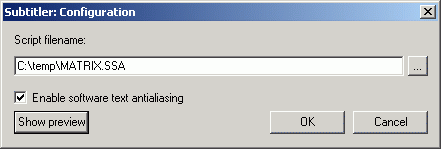
Show preview will enable you to see how the subs will look. You can use the buttons and the slider to navigate in the movie to check for synch and if the subs are ok.
Set Audio to Direct Stream Copy and Video to Full processing mode. Then select the desired compression - CTRL-C - and save the AVI by pressing F7 and selecting a filename if you're encoding to DivX. Otherwise you have to set up a frameserver and to load the .vdr file into your MPEG encoder.
>> Read more about
VIRTUALDUB FRAMESERVING
>> BACK
Credits:
Thanks to CF18 for srt2ssa and Orqyman for explaining this method to me.