Micro DVD Player Guide
Interested in making really perfect rips? Do you want to have subtitles that you can turn off and on anytime you want, additional audio tracks, and most important of all... DVD-like menus with animation sound and all the fancy stuff? Then you've come to the right place.
Be warned tough.. especially the menus stuff is really HARD to make. Only reading this guide can only give you a slight idea of all the work that is involved. You'll see when you try to do it on your own. When you've successfully made your first rip including menus then you'll understand some of the hard work that is involved in creating a DVD. And what we're going to do here is only a slight bit of that whole process - we already dispose of the necessary material - when authoring you have to create all the animations and graphics on your own. No wonder are DVDs not cheaper - replication is only the smallest part of the production costs of a DVD.
If you're still willing to go on here's the catch: This is NO BEGINNERS GUIDE! That means that if you don't know terms like streamlist, if you don't know how to synch manually and to use all your rip tools without blinking your eyes you've come to the wrong place and should go back to the basic guides. Remember that everybody has to start with the easy stuff - Michael Schumacher didn't win his first F1 Grand Prix when he was first in a racing car.. Also.. reading the documents provided in the MDVDP package is imperative, many things you can do are not completely described. The goal of this guide is to give you an idea on how to proceed so that you won't have to spend dozens of hours reading the documentations like I had to, but you still need them as a reference. They also contain 2 very good examples to take a look at. Consider them as an API reference - sort of - for the "programming language" of the Micro DVD Player. You can do lots without them but from time to time there's simply no way around it. Please don't mail me asking questions about details in the ini files - you really HAVE TO READ THE DOCUMENTATION. If you try to contact the author he'll tell you the same. What you can do if in need for help is the visit the official homepage and make a post to the forum. It's there where the real pros meet.
Step 1: Preparations
First of all you need to have the WHOLE DVD on your hard disk, not just the main movie. I'm talking all files here, vobs and ifos - you can leave the bup files away if you want. Then you should already have converted the movie to an AVI, multiplexed with the audio track and synched it. If you had to synch manually, note those values, you're going to need them soon. If you want subtitles, you should have them extracted, too. Next you have to strip all the soundtracks from the movie vobs in case you want to integrate them. To do so, create a streamlist that containing all vobs files which contain the main movie. Then run vstrip and extract the soundtrack you want. Example: You want the commentary track on "The Matrix". The movie consists of 6 vobs: vts_02_1.vob up to vts_02_6.vob. Therefore create a streamlist that contains pathnames and filenames of these 6 vob files. Assuming that you've called this streamlist matrix.txt your command line looks something like that: vstrip @matrix.txt commentory.ac3 ! d 0xBD 0x82 . That will strip the soundtrack number 0x82 (hex) to a file called commentory.ac3. Of course you can use the GUI for that if you prefer..
If you want menus and special stuff you have to convert the remaining vob files. Play them in a software DVD player to see what they contain, convert those you want to keep. For instance if your main movie is contained in vts_02_1.vob up to vts_02_6.vob the menu resides in vts_02_0.vob. Usually it contains the animates stuff in the beginning and still pictures in the end. Convert everything, multiplex if you don't use flask - convert the audio if using flask - it and cut away the stuff that you don't need. Keep in mind that you keep the transition videos from one menu to another, we can still use them later on. To get still pictures I suggest you use a screen capture tool or the screen capture function that many software players offer. Then convert those pictures to a sizable format like jpg and resize so that they have the same size as the menu video - do the same with the other vob files that contain trailers, music videos, making-ofs, whatever. It's up to you what you want to keep..
Step 2: Get the secondary soundtrack ready.
Convert ac3 track to wave format using whichever method you prefer - the method described in the guides or the alternative ones. Then you have to load the main movie into VirtualDub and multiplex it with the secondary audio track - make sure you don't overwrite the file containing the primary soundtrack. Use the exact same settings you've used to multiplex the primary soundtrack and you should have no problems.
Then it's time to cut your movie to fit on 2 CDs - skip this step when you're making a 1 CD movie. MDVDP allows you to have the main movie over 2 CDs and to have the specials on a 3rd CD. Note the exact position where you've split the movie, then load the avi containing the secondary soundtrack and cut it at the exact same position - I'm talking exact same frame here. Then load one of the splitted avis containing the secondary soundtrack and extract the soundtrack to a wav file:
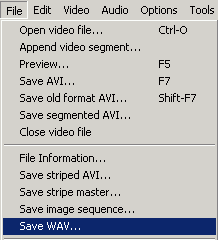 Just
click on Save WAV, then select a suitable filename and save it. After
a couple of minutes you'll get a wav file containing the first half of
the secondary soundtrack. Repeat the process for the 2nd part of the movie
- once again make sure you load the right one.. Save the audio track again.
Just
click on Save WAV, then select a suitable filename and save it. After
a couple of minutes you'll get a wav file containing the first half of
the secondary soundtrack. Repeat the process for the 2nd part of the movie
- once again make sure you load the right one.. Save the audio track again.
If you want to have even more languages you have to do that whole process for each and ever language - keep in mind that the more soundtracks you have, the less space your movie can use and it'll have a considerable impact on image quality.
Step 3: Creating an ini file
Now it's getting serious. Start the MDVDP INI Editor - you can find it in the same directory as the player itself:
![]()
Click the 2nd button on the left to start the INI Wizard:
Note that there's a question mark besides everything checkbox/textbox/etc. Click on it when in doubt.
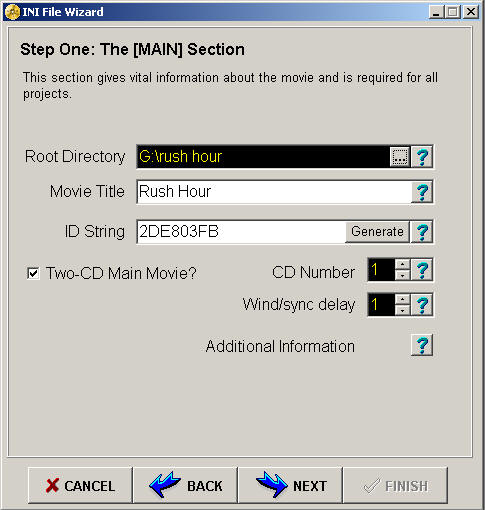
Select the root directory of your project. That only specifies where all the files are located when creating the ini file. You don't have to specify your CD-ROM here. Chose a title, and generate an ID String - used to identify which CDs belong to a particular movie. Select if you have a movie over 2CDs, and leave the rest as it is. Then click next:
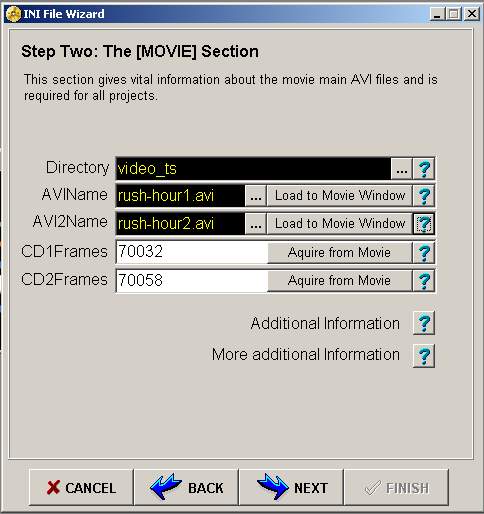
Select the directory name where the movie is going to be stored. This pathname is relative, so it's c:\video_ts if on drive c, or f:\video_ts if your CD/DVD drive has the letter f. In general I suggest the following structure for a movie: video_ts for video stuff, audio_ts for audio tracks and menu_ts for menu stuff. Unfortunately the Acquire from Movie option doesn't work yet, so you have to enter the values yourself. You can use VirtualDub to find out how many frames the splitted avis have. Click next..
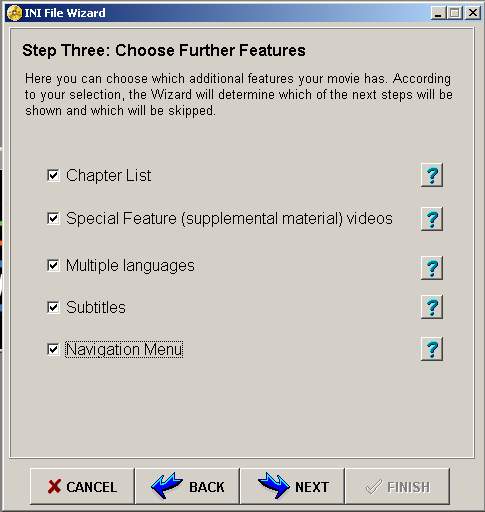
Quite obviously we're going for all the good stuff. Select whatever you want to make, leave out the rest. Click next..
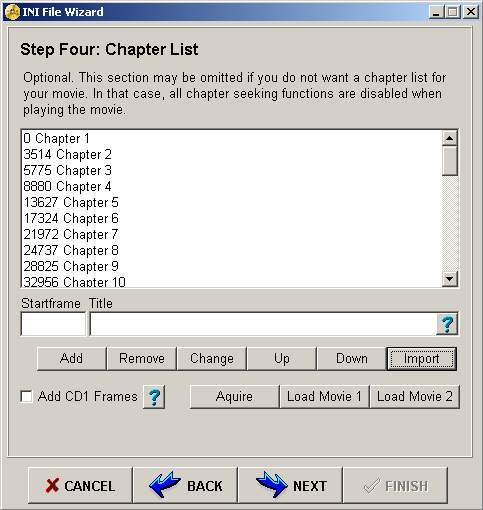
There's two methods to make chapters: manually and automatically. If you want to chose your own chapter stops, click Load Movie 1, use the controls at the bottom of the Editor window to navigate and find a suitable position.

When you've found one, click Acquire and the framenumber will show up in the Startframe text field. Give the Chapter a name and click add. For the 2nd CD, Load Movie 2, check Add CD1 Frames and make the same again. If you prefer the original chapterstops you have to use another program to extract them from the ifo files.
Start VobSnoopy, load the ifo that corresponds to the main movie. In The Matrix that would be vts_02_0.ifo since the main movie is located in vts_02_x.vob. Then click on Extract.
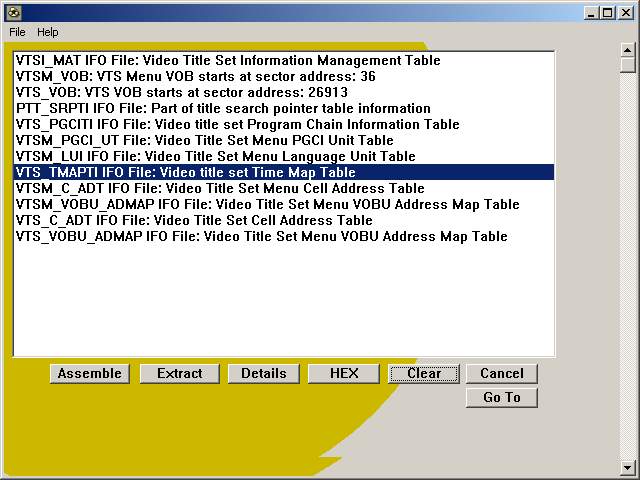
 Select
Disassemble *.IFO file, then enter a filename when asked for.
Select
Disassemble *.IFO file, then enter a filename when asked for.
After that step click on Import in the INI Editor and select the ini you've just created.
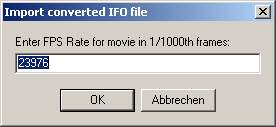 Enter
the correct framerate, 23976 for NTSC or 25000 for PAL. After that the
editor window should look like that. Click on
Next..
Enter
the correct framerate, 23976 for NTSC or 25000 for PAL. After that the
editor window should look like that. Click on
Next..
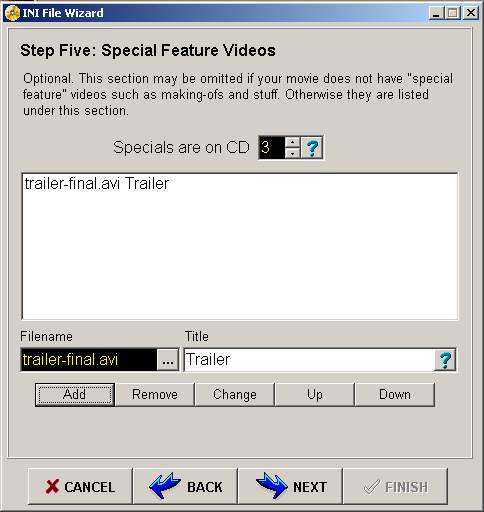
Select any special videos you might have and indicate on which CD they are stored. Click next when you're done..
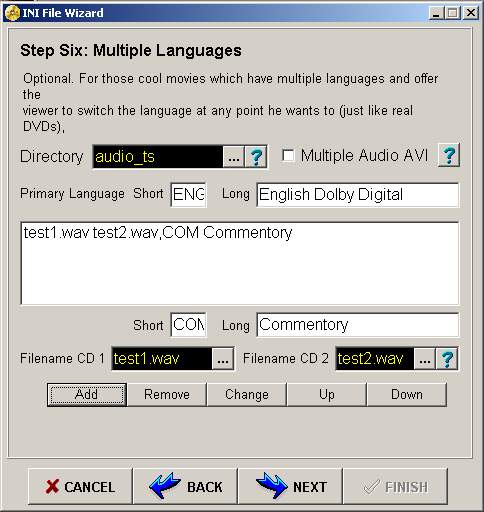
Chose the directory where the alternative sound files are stored. Enter a 3 letter and a long description for the primary and alternative soundtrack, also chose the filenames for the alternative soundtrack. Then go on to subtitles.
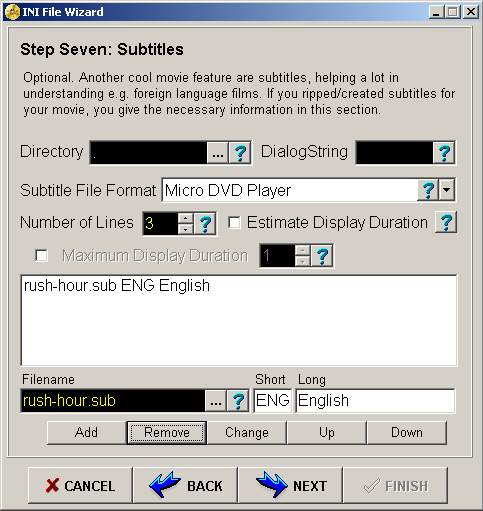
When you've followed my guides your subtitles will already be in MicroDVDPlayer Format, otherwise just chose the right format. Also indicate the directory where the subtitle file is stored and give a short and long description for the language. Then go on to the final step:
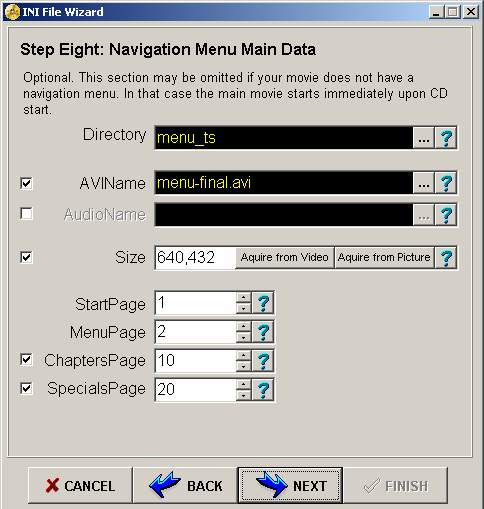
Select the directory where your menu files are stored, indicate an avi if you have an animated menu. Select an audio file if you have a static background but would like to insert some music. After that a rather cryptic Editor will pop up, containing some of the information you've entered. Although most things works, the menu entries were not correct after running the wizard.
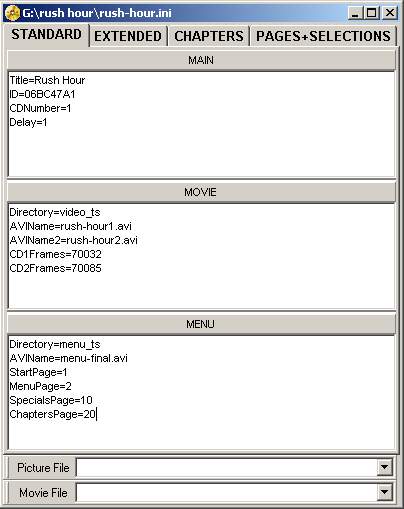 Adapt
the entries in MENU so that they correspond to the path and filename your
menu stuff has. I called the directory for the menu stuff menu_ts and
the main menu video is called menu-final.avi. I've given the main page
- page that MDVDP loads when loading the movie - number 1 and menu page
- page that is displayed whenever you press menu during playback number
2. Furthermore page 10 contains the Specials and Page 20 the Chapters.
This choice is purely arbitrary. You can chose freely but you must respect
that all numbers are smaller than 500.
Adapt
the entries in MENU so that they correspond to the path and filename your
menu stuff has. I called the directory for the menu stuff menu_ts and
the main menu video is called menu-final.avi. I've given the main page
- page that MDVDP loads when loading the movie - number 1 and menu page
- page that is displayed whenever you press menu during playback number
2. Furthermore page 10 contains the Specials and Page 20 the Chapters.
This choice is purely arbitrary. You can chose freely but you must respect
that all numbers are smaller than 500.
Click on the Chapters tab and you'll see all your chapters and you can rename them if you imported the subtitles from an ifo file in the wizard. The Pages and Selections tab is the most interesting for us since here we can create interactive content.
Right-clicking the mouse will reveal pop-up menus which you can use to various things, just experiment a little.
If you right-click in the Pages and Selections section you'll get the following useful popup:
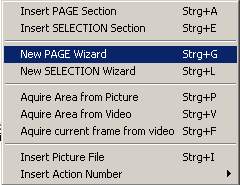 The
most interesting for us are New PAGE Wizard and New SELECTION Wizard.
Use the page wizard to create a new page - like a HTML page, with links
to other pages - and the selection wizard to create a hotspot - clickable
area - in a page.
The
most interesting for us are New PAGE Wizard and New SELECTION Wizard.
Use the page wizard to create a new page - like a HTML page, with links
to other pages - and the selection wizard to create a hotspot - clickable
area - in a page.
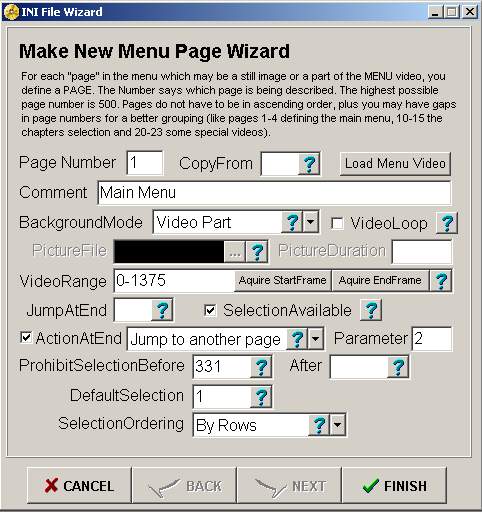
Here we're creating page number 1, as you might remember our start page. Use comments often since it will help you when you're reading the ini file later on. Select whether you have a movie or an image. In case of a movie, select the range you want to display. For instance many animated menus have a part of the video where you can't select anything, since the selections are not yet visible. Select the range of the menu video you want to display, select where it should jump at the end - if you want to repeat the video check VideoLoop, or you can jump to another page - parameter means page number - or whatever. Since this particular menu won't show the selections until frame 331 I chose to prohibit selection before that particular frame. DefaultSelection indicated which menu item is selected by default - like play movie is selected by default in most DVD movies. SelectionOrdering is only important for those with a remote control - it indicates how to navigate the menu using the remote. Click finish.
Next create a selection:
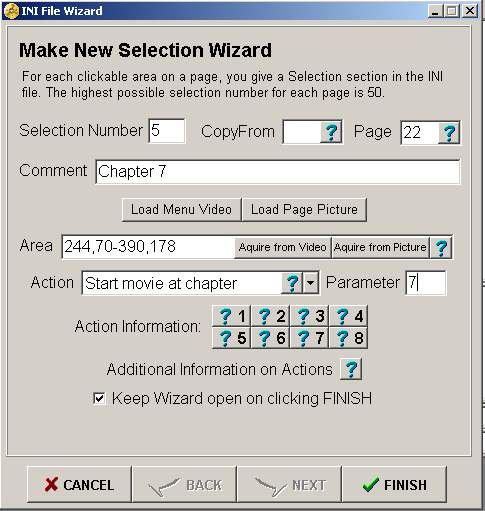
Chose a number for your selection hotspot - respect the limit of 50 hotspots per page. You can use CopyFrom if you've already defined a selection on another page. The CopyFrom feature works like this: I suggest that you get the example and look at it since my explanation is based on it. Suppose you have defined some selections on page 22 - which is a page that contains links to different chapters. You'll see that for page 23 I've used very few lines. Just add CopyFrom page22, specify another image for the new page, and all you have to do for the links - they are located at the exact same spots on the image - is to change the selection parameter which represents the chapters where you want to go to.
It's imperative that you select to which page this selection belongs. Click LoadMenu Video or LoadPage Picture and the window with the corresponding image/video will pop up. In that window you can define hotspots by clicking with your mouse, then dragging like you can do in Windows. Unfortunately in case of a video file you can't see the selections you've made. Click Acquire from Video/Picture and the coordinates of your selections will be entered. Define the action - in the example it's a chapter selection so it will start the movie at a give chapter.
You'll spend hours defining pages and selections until everything works out and is linked. See... now you're beginning the respect the work of all DVD authoring studios. Maybe you can go work there since you know how that stuff works, now. Save your work often, the INI editor is still a bit unstable..
Here's an example of how an ini file looks, note that it's far from being completed. One important issue: You have to copy the first part of the movie to the video_ts folder on the first CD, the first alternative audio track to audio_ts on the first CD, all menu files to menu_ts on all CDs and the ini files on all CDs. The following line in the [Main] Section of the ini file needs to be changed for each CD: CDNumber should indicate the number of the CD, 1 2 or 3. Playback from the 2nd CD will fail if you forget to do that.
Step 4: Playback
Ready for the big moment? Your first interactive ripped DVD.
Start up Micro DVD Player and click on the Change Configuration button - the one with the hammer on it, rightmost button in the bottom line of buttons. Then click on Source

Select the source you're loading from and chose the ini file you've just created. Click OK and press the play button in the player. Enjoy your work you've deserved it.