The fastest (but most complicated) way:
Step 1: Rip the movie
Start up a software DVD player to authenticate the DVD. Then start the mpeg2avi/ac3dec/vstrip gui and go to the vStrip part.
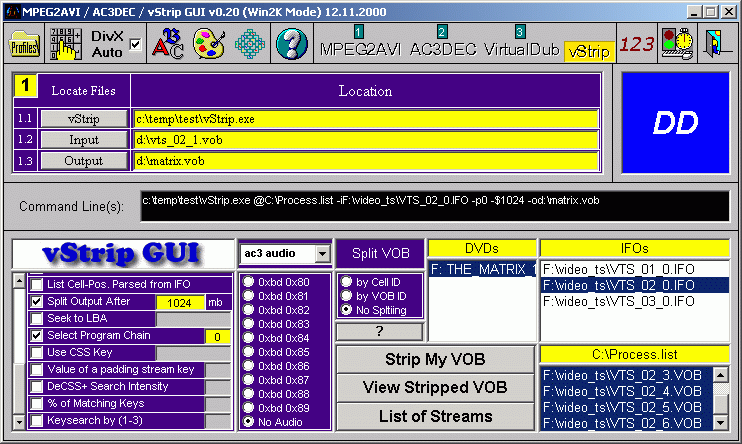
Locate the largest .ifo file on the DVD and select it in the GUI. You'll then be presented with a list of PGCs on the DVD.
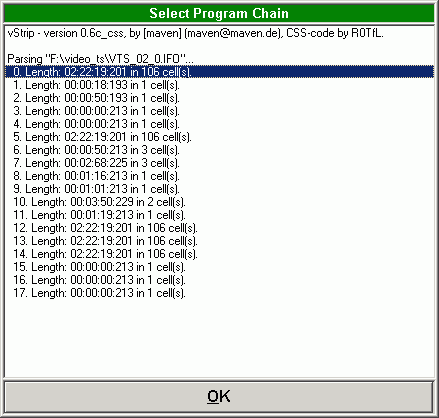 Usually the main movie is contained in PGC 0. The example shown is a complicate
title: The Matrix. You can see two PGCs that have the same length. PGC
5 contains the white rabbit feature. If you have a seamless branching
title you may have several long PGCs.. just select the one corresponding
to the version of the movie you like (play the movie, fastwordard to the
end and note the length of a certain version if you're unsure).
Usually the main movie is contained in PGC 0. The example shown is a complicate
title: The Matrix. You can see two PGCs that have the same length. PGC
5 contains the white rabbit feature. If you have a seamless branching
title you may have several long PGCs.. just select the one corresponding
to the version of the movie you like (play the movie, fastwordard to the
end and note the length of a certain version if you're unsure).
Then press OK.
Also check Split Output After and enter a suitable value. I suggest 1024MB. If you have a movie that contains mastering errors (can't be played on the PC), select DeCSS+ Search Intensity and enter 1 in the corresponding field, and check Keysearch by and enter 1 in that field as well. Then press Strip my VOB.
Step 2: Convert the movie.
Start up the GUI. Select ac3dec mode.
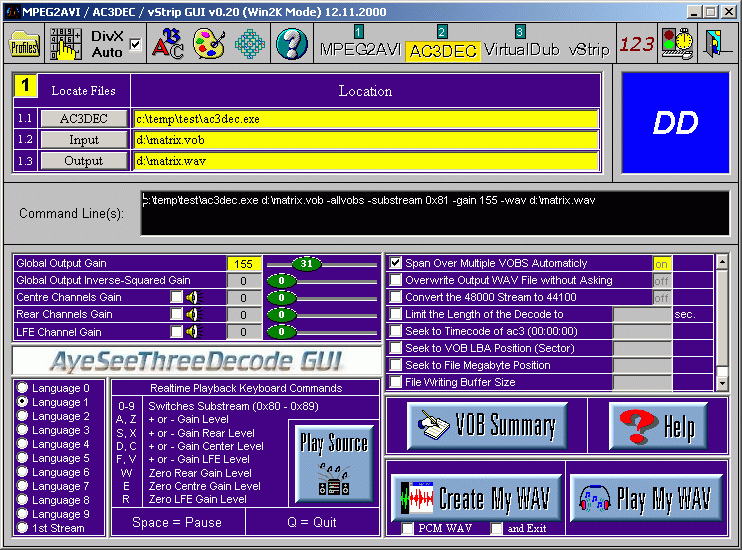
When using the GUI make sure that you've selected the same options as in the picture above (except for the language of course :) Load the first VOB file that vStrip ripped and select Span over multiple VOBs to treat all VOBs.
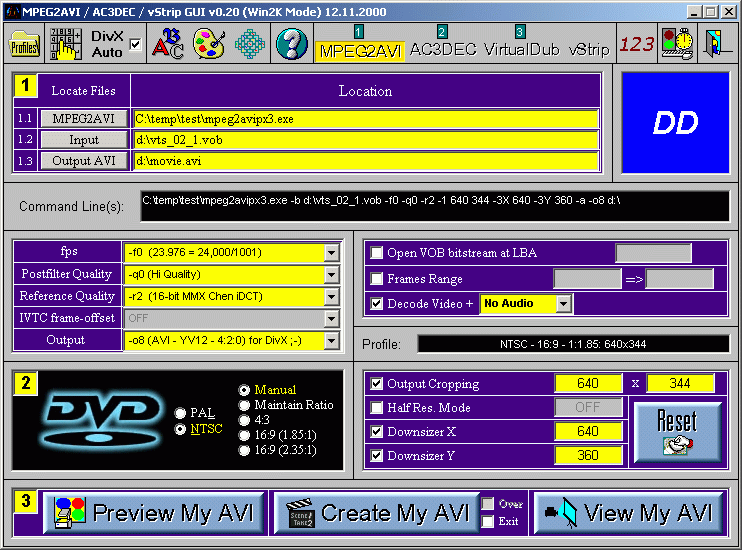
Now go to the mpeg2avi section, enter all the necessary information like the place where mpeg2avi is stored, path and filename of the output file. Load the corresponding profile for your movie by pressing on the Profiles button. All profiles are for NTSC but the only thing you have to do when you have a PAL movie is to check PAL in the (2) section of the GUI.. Also make sure that you select a streamlist as input file because if you encode the files separately you'll have a couple of garbled frames after each vob and probably a real hard time synching again. Also not that mpeg2avi has a certain limit to streamlists: It can only handle streamlists that contain less than 8 files - 16 in the case of mpeg2avi PX3 0.005. So if your movie consists of 8 files you will have to merge two of them using Filemerger which you can get on the download page, preferably the last two since the last one is usually a lot smaller than the rest.
This is also an appropriate time to talk about IVTC. Basically IVTC will allow you to restore what's really on the DVD, that is 24 progressive frames per second. Mpeg2avi usually gets off-synch while encoding movies manually. IVTC can in many cases fix that. There are some pretty definitive settings for movies from a couple of studios so you may want the check them out. That article also give you the basics so I won't have to talk about it again. Generally -s4 is a good option and it synched many movies from the very beginning. Another way to get pretty good synch is DVD2MPG and FlaskMpeg will always be synch (provided that you don't touch the samplingrate of the audio in FlaskMpeg), but has to deinterlace movies that are encoded using non-standard rff sequences. Mpeg2avi is no beginners tool... but exactly that makes it pretty interesting. It can deal with movies that FlaskMpeg requires you to deinterlace and the results of a deinterlacer are never perfect.
Mpeg2avi can also demux an audio tracks during ripping, so when using mpeg2avi PX3 you could select Decode Video + AC3 audio but it's not really necessary to demux the ac3 as ac3dec can open VOB files.
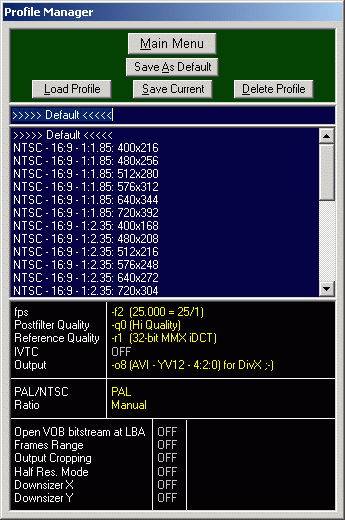 Chose
your profile by pressing the Profiles button and select one that suits
your needs. Alternatively you enter your own settings by enabling output
cropping and the Downsizer options. Read the
bitrate and resolution guide to get an idea on what settings to chose.
Once you're happy with your own settings you should save them for later
use. Simply select all the desired options and then start the profile
manager - F5 - and click on Save Current. In the future I will add more
profiles that will make synching easier. But you could greatly help me
with that if you send me any profiles
that'll get you synch movies without any fiddling around in VirtualDub,
changing framerate and such.
Chose
your profile by pressing the Profiles button and select one that suits
your needs. Alternatively you enter your own settings by enabling output
cropping and the Downsizer options. Read the
bitrate and resolution guide to get an idea on what settings to chose.
Once you're happy with your own settings you should save them for later
use. Simply select all the desired options and then start the profile
manager - F5 - and click on Save Current. In the future I will add more
profiles that will make synching easier. But you could greatly help me
with that if you send me any profiles
that'll get you synch movies without any fiddling around in VirtualDub,
changing framerate and such.
Press the DivX Auto Button to enter your default settings for the DivX codec. If you're using the same settings every time it's a really neat thing since DivX Auto will select the right settings automatically and if you're using the 1-2-3 feature of the GUI you'll need to set DivX Auto, too, since otherwise after the ac3decoding is done you'll have to select a codec again - that's why ac3decode is the first program to run in that mode.
A little explanation of the 1-2-3 mode since we have some space left: If you set every option needed in all the mpeg2avi, ac3dec and VirtualDub window, you can simply press the 1-2-3 button in the upper left corner and the GUI will then run ac3dec, mpeg2avi and VirtualDub in sequence. The only thing you have to do is set DivX Auto and enable it, and chose the audio codec at the beginning of the operation. The rest is fully automated. Great isn't it?
Now that we've talked so much about DivX Auto you want
to know how to calculate the bitrate and once again the GUI has just the
solution for you. Press the calculator button to see the calculator.
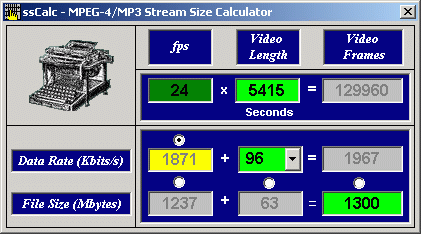 Here's
the Bitrate calculator. Enter the desired output size in the field saying
652, chose the desired bitrate for audio (where it says 96) and enter
the video length (length in seconds * framerate - 25fps for PAL, 23.976
for NTSC). Keep in mind that DivX is variable bitrate even if it should
be otherwise. More information about bitrate in the bitrate
and resolution guide.
Here's
the Bitrate calculator. Enter the desired output size in the field saying
652, chose the desired bitrate for audio (where it says 96) and enter
the video length (length in seconds * framerate - 25fps for PAL, 23.976
for NTSC). Keep in mind that DivX is variable bitrate even if it should
be otherwise. More information about bitrate in the bitrate
and resolution guide.
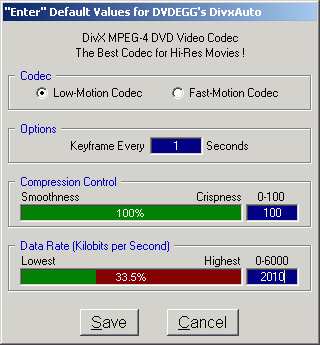 Here
is the DivX Auto option window. It should be pretty obvious what do to.
Enter the desired values in the corresponding window (blue background)
and press save.
Here
is the DivX Auto option window. It should be pretty obvious what do to.
Enter the desired values in the corresponding window (blue background)
and press save. 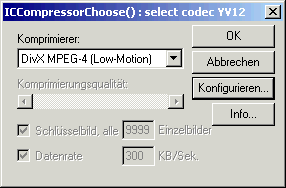 In
case you decide not to use DivX auto, you'll get the following configuration
dialog. Press Configure to configure the DivX codec. You have to chose
the exact same options as in DivX auto. I suggest that you use a
keyframe every second since that's the safest way to prevent freeze-frames
(audio goes on while video is stuck). It'll take slightly more space but
that's definitely worth it.
In
case you decide not to use DivX auto, you'll get the following configuration
dialog. Press Configure to configure the DivX codec. You have to chose
the exact same options as in DivX auto. I suggest that you use a
keyframe every second since that's the safest way to prevent freeze-frames
(audio goes on while video is stuck). It'll take slightly more space but
that's definitely worth it.
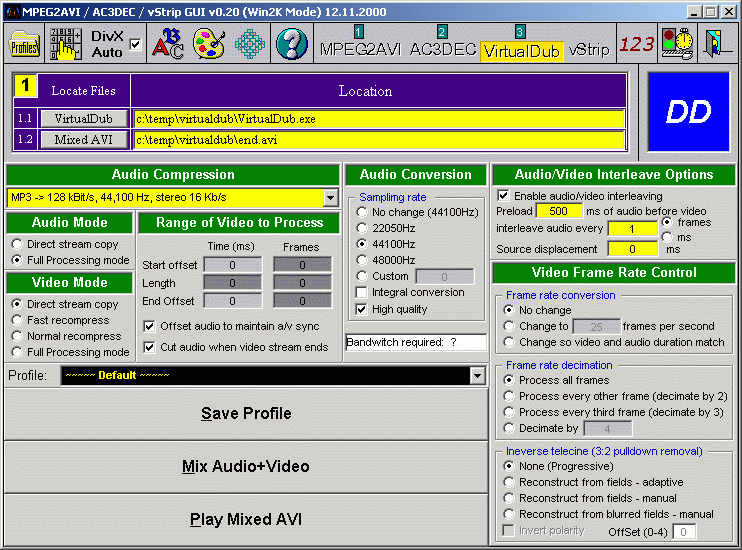
Here's the final step to make the 1-2-3 option work. Select Full processing mode in the Audio Mode tab, Direct Stream Copy in the Video Mode tab, convert the sampling rate if your soundcard is not 48Khz capable or if you want to use DivX audio - make sure you chose High Quality if changing the samplingrate. Select your desired Audio Compression, leave the Audio/Video Interleave Options as default, or change the interleave audio every 1 frames to every 500ms if it just doesn't get synch. All the manual synching in VirtualDub can be done via this GUI if you like to. In that case press Mix Audio and Video - make sure that the output filenames in the mpeg2avi and ac3dec options are set correctly.
Now we're ready to roll. Make sure that you've set every
option right, then press the 1-2-3 button. A small window will pop up
asking you to enter an audio codec. Just press ok, the selected 48Khz,
187kb/s are perfectly good, the compression is being done later. Keep
in mind that compressing audio in ac3dec is a major source for asynch
movies since the mp3 codec does not report the real bitrate to the players.
Also, ac3dec is not DivX audio capable.
Of course you can do your movies in command line mode, without all this
fancy GUI stuff, too. Here's some sample syntax:
Sample mpeg2avi command line for an NTSC 16:9 1:2.35
movies "MPEG2AVI.EXE -b movie.vob -f0 -q0 -r2 -3Y 408 -1 720 304
-o8 movie.avi"
Sample ac3dec command line: "ac3dec vts_01_1.vob -allvobs -substream
0x80 -gain 250 movie.wav".
If you followed the instructions for the 1-2-3 method you should be done by now.
>> Read more about
OUT OF SYNCH
Step 3: Multiplexing
Multiplex audio and video together using VirtualDub. 1: File - open Avi file - movie.avi. 2: Video - direct stream copy 3: Audio - WAV Audio - movie.wav 4: Audio - Conversion: 44100Hz, High quality 5: Audio - compression - Mp3 audio @ 96kbp/s 6 Audio - full processing mode 6: File - save AVI movie-mux.avi. Leave the rest of the options as they are.Step 4 is optional and you can of course chose DivX audio, 64kbit/s, 44Khz for audio/video instead of Mp3.
>> Read more about
AUDIO COMPRESSION
The process described above should get you a fully synch avi at full DVD resolution and DolbyProLogic Surround.
>> Read more about
SPLITTING