FlaskMpeg Guide
Step 1: Rip the DVD
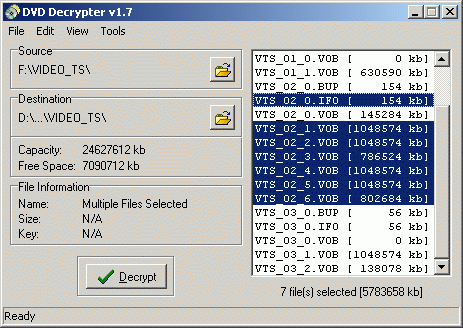 During
startup the program will automatically authenticate the DVD drive and
it will then mark the main movie for decryption. All you have to do is
chose the destination folder and press the Decrypt button.
During
startup the program will automatically authenticate the DVD drive and
it will then mark the main movie for decryption. All you have to do is
chose the destination folder and press the Decrypt button.
Mark the main movie by selecting Edit - Select Main movie files, then press the decrypt button.
>> Read more about
OPTIONS
OTHER RIPPERS
DECRYPTION
PROBLEMS
Step 2: Flasking
Make sure you don't just press the OK button the first time you start up FlaskMpeg, instead chose the right language in the dropdown list right above the OK button.
 Start
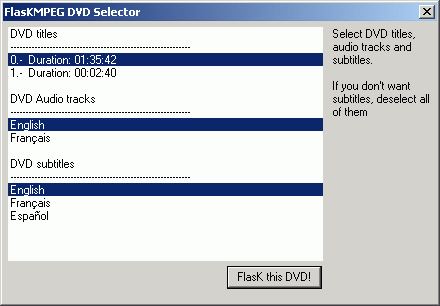
FlaskMpeg. Choose file - Open DVD and select the ifo file you've copied.
Select the title you want - generally the one that has the longest duration.
Start
FlaskMpeg. Choose file - Open DVD and select the ifo file you've copied.
Select the title you want - generally the one that has the longest duration.
Also select the audio track you want to extract and subtitles. If you don't want subtitles simply deselect them.
You must have all VOB files of the main movie on your harddisk, otherwise ifo parsing won't work!
>> Read more about
ALTERNATIVE WAY

The picture shows PowerDVD running "The Matrix" in "Follow the white Rabbit" mode. You can see that this mode is title 6. If you select standard play the title would be Title 1. You can also find out what title the menu, the extras, etc have. As for how to find out how to select the right audio track you can right-click in the movie window, then select audio and you'll see which audio stream is currently being used. Make sure that you select the right audio stream in the DVD menu before playing back and the right subtitle and you should have no problem associating the right audio stream and subpicture stream in FlaskMpeg.
Now select options, then global project options.
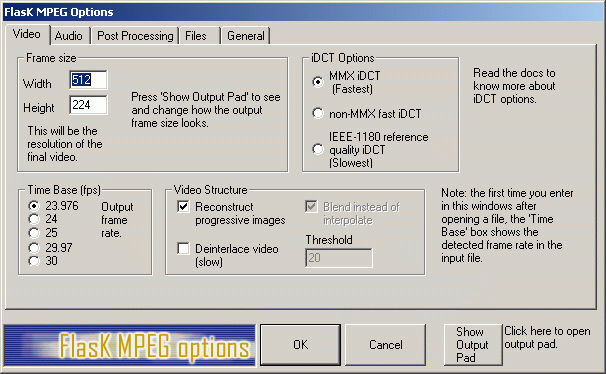 You
don't have to change anything here. Usually Flask is able to correctly
recognize the framerate. Just verify that 23.976 is selected for NTSC
movies, and 25fps for PAL movies. MMX iDCT is the best choice. Make sure
the Reconstruct Progressive images checkbox is checked.
You
don't have to change anything here. Usually Flask is able to correctly
recognize the framerate. Just verify that 23.976 is selected for NTSC
movies, and 25fps for PAL movies. MMX iDCT is the best choice. Make sure
the Reconstruct Progressive images checkbox is checked.
To make sure that your settings are correct use the FlaskMpeg
player: Close the FlaskMpeg MPEG Options and select Run - Player.
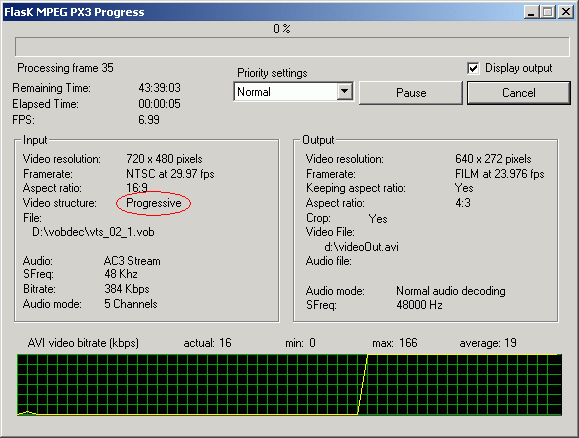
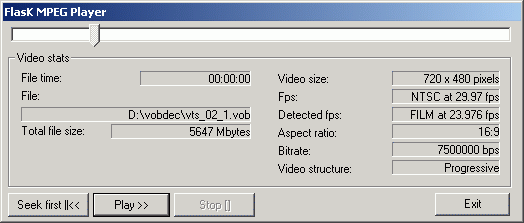 If
your video is PAL then you don't have to care about the following. If
the Video structure stays at Progressive all the time then youre settings
are ok. If it changes between progressive and interlaced you can select
Time Base to 29.97 and enable the deinterlacer, set to Blend instead of
interpolate. Threshold means how much movement is needed until the deinterlacer
will kick in.
If
your video is PAL then you don't have to care about the following. If
the Video structure stays at Progressive all the time then youre settings
are ok. If it changes between progressive and interlaced you can select
Time Base to 29.97 and enable the deinterlacer, set to Blend instead of
interpolate. Threshold means how much movement is needed until the deinterlacer
will kick in.
Deinterlacing is a good option the lower your resolution and bitrate is..
at high bitrates and resolutions like I encode it's better to use another
program or use FlaskMpeg only as frameserver. DVD2MPG
and mpeg2avi can encode these movies at 23.976fps
without interlacing artifacts. If you'd rather use FlaskMpeg you can set
it up as frameserver with VirtualDub as encoder or go to DVD2AVI right
away.
>> Read more about
AVISYNTH SETUP
IVTC IN VIRTUALDUB
DVD2AVI
Then select the Audio tab.
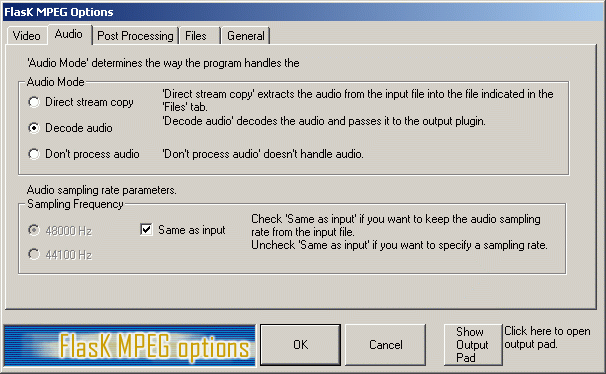 Activate
Decode audio. Make sure you have selected the right Sampling Frequency.
In some cases FlaskMpeg will set the wrong frequency. I have yet to see
a movie that has 44.1Khz but it's possible that TV series and music DVDs
have that sampling frequency. If in doubt start the disc in a software
player and look at the options - generally right-click the configuration
- information in PowerDVD.
Activate
Decode audio. Make sure you have selected the right Sampling Frequency.
In some cases FlaskMpeg will set the wrong frequency. I have yet to see
a movie that has 44.1Khz but it's possible that TV series and music DVDs
have that sampling frequency. If in doubt start the disc in a software
player and look at the options - generally right-click the configuration
- information in PowerDVD.
If the movie is 48Khz but 44.1Khz is selected, uncheck
Same as input, select 48Khz and check Same as input again.
If you want to make an Avi with AC3 soundtrack, just select Direct Stream
copy here and you'll end up having an avi without sound and an ac3 file.
If you're using Windows98 you might not be able to read the files and
you don't want to upgrade to Windows2000 - although I can't possibly understand
why you wouldn't want to, it's WAY BETTER - then click on Direct Stream
Copy, too. Or you can select a compressed audio codec later on but be
prepared for some major synch issues.
>> Read more about
CODEC SELECTION
Read the Bitrate and Resolution guide on how to find out the best Bitrate and how to change the resolution. If you don't want to use the ifo parsing mode - Open DVD - and Flask won't detect all language streams, select the General tab and increase the Search Size. You can also set the filename and directory of the output file in the Files section. If you've set everything click ok.
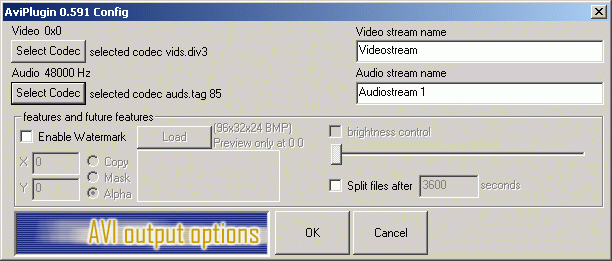
Then select Options then Output format options. The following configuration dialog will pop up. It's imperative that you do this step before starting the conversion.
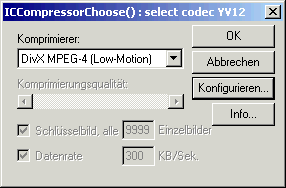 Chose
DivX low-motion, then select configure and set keyframes to 1 second (this
is to prevent that audio goes on while video is stuck till the next keyframe),
crispness 100 and your desired datarate. Select PCM Audio at 48.000 Hz
(187KB/sec). I strongly suggest that you don't compress the audio and
leave the sampling rate to 48Khz. Everything else could lead to asynch
video. If you're using Win98 and can't read the avi afterwards I suggest
you upgrade, or select a compressed audio codec but be prepared to repair
the synch in the end. If using a compressed audio codec you can of course
change the sampling rate in the FlaskMpeg options, just make sure that
you have selected the same sampling rate..
Chose
DivX low-motion, then select configure and set keyframes to 1 second (this
is to prevent that audio goes on while video is stuck till the next keyframe),
crispness 100 and your desired datarate. Select PCM Audio at 48.000 Hz
(187KB/sec). I strongly suggest that you don't compress the audio and
leave the sampling rate to 48Khz. Everything else could lead to asynch
video. If you're using Win98 and can't read the avi afterwards I suggest
you upgrade, or select a compressed audio codec but be prepared to repair
the synch in the end. If using a compressed audio codec you can of course
change the sampling rate in the FlaskMpeg options, just make sure that
you have selected the same sampling rate..
If for some reason you don't want to start the conversion at the very beginning select Start - Run Player. This will bring up FlaskMpeg's DVD player:
Press
the play button then use the slider to move around in the movie. When
your'e done press Stop.
Back in the main window press ok, then select Run - start conversion.
After this configuration we're rolling. After a long time (depending on
your CPU) we get a huge avi. If you selected compressed audio
you're now done but you might have synching problems.
>> Read more about
AVI/AC3
DECODING AC3
Step 3: Compressing the audio / multiplexing.
Multiplex audio and video together using VirtualDub. 1: File - open Avi file - movie.avi. 2: Video - direct stream copy 3: Audio - Conversion: 44100Hz, High quality (in case you haven't changed it in Flask already) 4: Audio - compression - DivX Audio @ 64kbp/s, 44khz for audio/video or a suitable mp3 compression 5: Audio - full processing mode 6: File - save AVI movie-mux.avi. Leave the rest of the options as they are. Alternatively you can select an Mp3 codec which allows you to have a higher bitrate but it will take way longer.>> Read more about
AUDIO COMPRESSION
The process described above should get you a fully synch avi in Dolby Surround.