Cinema Craft Encoder Guide
This encoder is lightning fast, however it has one severe drawback: it is not for free... If you're willing to spend that kind of money (the Lite version is $250 alone and that version is not enough to do SVCD and miniDVD since it doesn't support the kind of bitrate settings we need, and the SP version is about $3500) or if you are willing to get the program by other means then this is for you..
CCE does not support 3:2 pulldown, but using pulldown.exe it's still possible to encode at 23.976fps and later on convert the movie to 29.97. Just run "pulldown.exe cce_outputfile.mpv" which will give you a file called pulldown.m2v. If you're encoding at 29.97fps you don't have to use pulldown.exe.
Now it's time to start CCE. As you can see the user interface is not exactly
what I'd call user friendly and it took me a while to figure out to load
a file to encode but I finally got there. So right-click, then click on
add in the menu that appears as shown below..
 That
will open a window where you can select your input file. Despite not being
stated CCE is also able to read VirtualDub frameserved .dvr files as well
as Avisynth .avs files, you'll just have to set the file type to all files
as by default only .dv, .avi and .mov will be selectable.
That
will open a window where you can select your input file. Despite not being
stated CCE is also able to read VirtualDub frameserved .dvr files as well
as Avisynth .avs files, you'll just have to set the file type to all files
as by default only .dv, .avi and .mov will be selectable.
 To
configure the encoding right click on the loaded file and press Edit.
To
configure the encoding right click on the loaded file and press Edit.
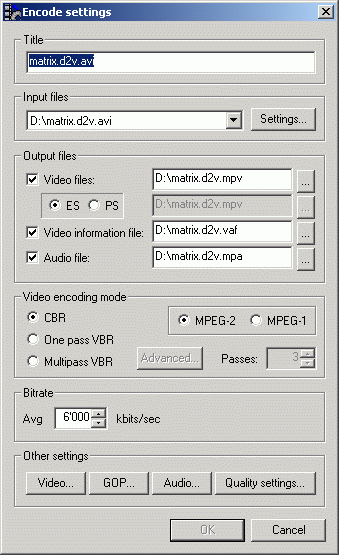 The
following window will pop up. Here you can configure the video encoding
mode. CCE allows for multipass VBR encoding which results in a better
image quality. However, to do so your decoding program has to be able
to provide the same frame more than once to CCE. In case you're using
a real AVI file, or a VFAPI AVI this is no big deal, however, FlaskMpeg
is unable to do so unless you use a special version which you can also
download from my software page.
The
following window will pop up. Here you can configure the video encoding
mode. CCE allows for multipass VBR encoding which results in a better
image quality. However, to do so your decoding program has to be able
to provide the same frame more than once to CCE. In case you're using
a real AVI file, or a VFAPI AVI this is no big deal, however, FlaskMpeg
is unable to do so unless you use a special version which you can also
download from my software page.
ES means elementary stream, that is audio and video will be separate. PS means program stream and will results in a multiplexed audio/video stream.
In one pass VBR you can set a Q factor between 1 and 300. The smaller it is the better the image quality. Furthermore you can specify a max and min bitrate.
In multipass VBR you can also specify a desired bitrate. Furthermore you can specify the number of passes and do your own bitrate management when you press on the Advanced button. Since these options are rather complicated they will not be discusses here. Please refer to the CCE manual for more information.
You can also encode to MPEG-1 as of now.
The other settings allow you to access special video, audio and quality settings. Most settings are pretty straightforward, as audio bitrate and sampling rate for instance. You can usually leave the GOP settings alone. Do NOT select DVD compliant in the video settings unless you are making a miniDVD. Check Progressive Frames if you're encoding at 23.976fps, otherwise it has to be unchecked.
The Quality settings are interesting:
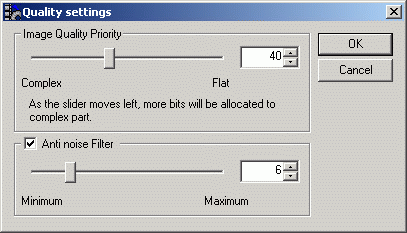 Here
you can decide how the bitrate will be allocated. The more you move the
slider to the left the more bitrate will e allocated complex parts.
Here
you can decide how the bitrate will be allocated. The more you move the
slider to the left the more bitrate will e allocated complex parts.
The anti noise filter is usefully when you have a DVD
with lots of noise. Well-encoded DVDs should not need that option at all.
If you click on Setting in the Encode setting, then right clock on the
loaded source file you can define the encode range and specify an external
audio file.
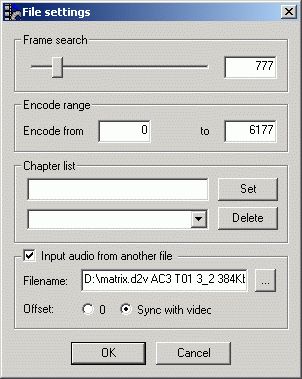 The
external audio source can be useful when you've used DVD2AVI to demux
the audio. Note that the audio source has to be 44.1KHz to be VCD or SVCD
compliant. CCE does not downsample the audio, that has to be done before.
The
external audio source can be useful when you've used DVD2AVI to demux
the audio. Note that the audio source has to be 44.1KHz to be VCD or SVCD
compliant. CCE does not downsample the audio, that has to be done before.
After setting all that press OK and then GO in the main window... Watch
as it encodes quite fast..
After a while you'll end up with an mpv and an mpa file, or an mpg file if you chose SP as stream type.
>> Read more about
MULTIPLEXING
CUTTING
BURNING