FlaskMpeg for VCD & SVCD Guide
Step 1: Rip the DVD
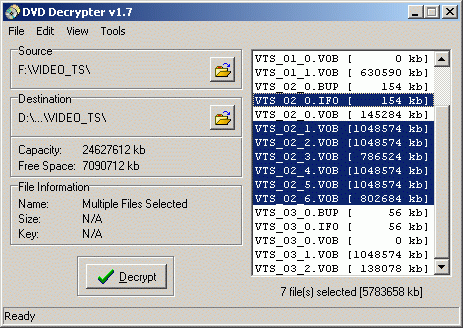
Mark the main movie by selecting Edit - Select Main movie files, then press the decrypt button.
>> Read more about
DVD DECRYPTER OPTIONS
OTHER RIPPERS
DECRYPTION
PROBLEMS
Step 2: Choosing your encoder
Now is the time to make an important decision: Which compressor are we going to use?
Below you can find a list of all encoders that are being discussed on this page.
| bbMPEG | CCE | Heuris | LSX | Panasonic | TMPG | |
| standalone/plugin | x/x | x/x | x/- | x/- | x/x | x/- |
| MPEG1/2 | x/x | x/x | x/x | x/x | x/- | x/x |
| quality | - | ++ | - | - | + | ++ |
| 3:2 pulldown | x | - | - | - | - | x |
| resizing | x | - | - | - | x | x |
| multipass | x | x | - | - | - | x |
| speed | -- | ++ | - | + | + | - |
I hope I got these all right, I don't use any other encoders than TMPG and CCE anymore. Of course, the quality is a relative issue and each of you might have another impression of how good the encoders encode.
Every standalone encoder can also be fed by FlaskMpeg and the Avisynth plugin, or by a VFAPI AVI.
For simplicity I suggest you use the bbMPEG encoder plugin since it's already included in the FlaskMpeg package. Other than that the encoder of my choice is TMPG, which is by a far cry the most flexible encoder. If you happen to have one of the commercial encoders that's where you want to go.
IMPORTANT NOTE: CCE, Heuris, LSX and Panasonic won't allow you to encode at 23.976 so whenever later in the guide I talk about choosing a framerate you don't have a choice with these encoders. Panasonic can also only used to make VCDs.
>> Read more about
USING A STANDALONE ENCODER
The following will instruct you to use a Premiere plugin in FlaskMpeg.
Step 3: Flasking
Make sure you don't just press ok the first time you start up FlaskMpeg, instead chose the right language in the dropdown list right above the OK button.
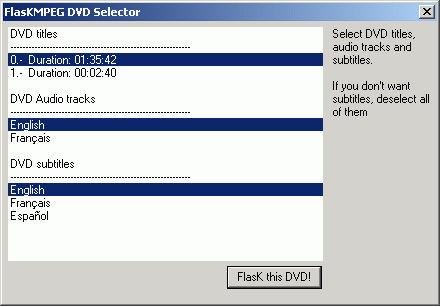
Also select the audio track you want to extract and subtitles. If you don't want subtitles simply deselect them.
You must have all vob files on your hard disk, otherwise ifo parsing won't work!
>> Read more about
ALTERNATIVE WAY

The picture shows PowerDVD running "The Matrix" in "Follow the white Rabbit" mode. You can see that this mode is title 6. If you select standard play the title would be Title 1. You can also find out what title the menu, the extras, etc have. As for how to find out how to select the right audio track you can right-click in the movie window, then select audio and you'll see which audio stream is currently being used. Make sure that you select the right audio stream in the DVD menu before playing back and the right subtitle and you should have no problem associating the right audio stream and subpicture stream in FlaskMpeg.
Now select Options, then Global
Project Options.
VCD allows the following frame sizes: 352*240 for NTSC and 352*288 for
PAL. Time Base is 25 for PAL and 29.97 for NTSC. You can skip
the following discussion.
SVCD allows more than just one frame size: In fact you can chose between
720/480/352 as horizontal resolution. The vertical resolution will always
be either 480 (NTSC) or 576 (PAL). The framerate is a bit more tricky.
PAL sources are always 25fps, regardless of what FlaskMpeg might detect.
NTSC can be either 23.976fps or 29.97fps.
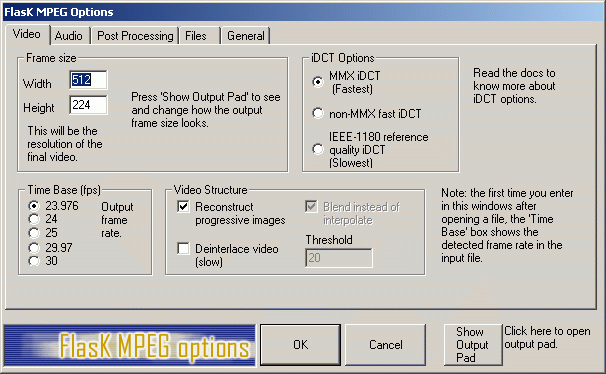
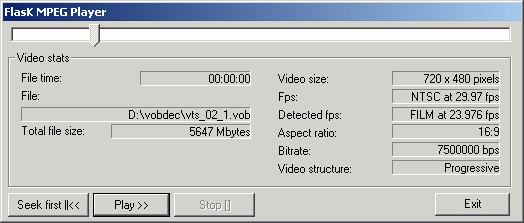
Then go back to the FlaskMpeg options and select the
Audio tab.
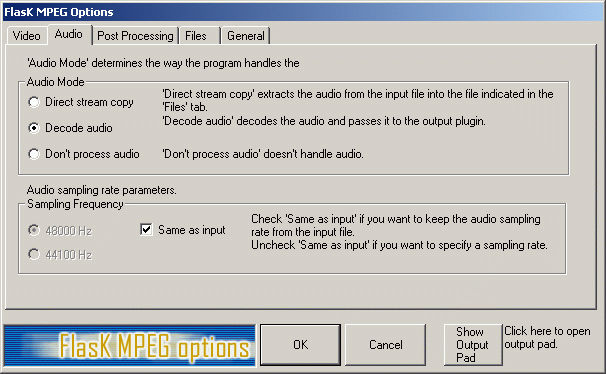
In Post Processing set HQ Bicubic Filtering - set by default - and make sure that No Crop and No letterboxing are checked.
The Files tab will allow you to chose a filename and a location for the output file.
It is up to you whether you prefer to do parts of a movie
or the whole movie at once. There are tools to cut the movie afterwards,
For the moment you have to manually set the encoding
time, otherwise the encoder will encode 300'000 frames no matter how long
the movie is. One way to find out the number of frames is to play the
movie in a DVD player, note the time at the end of the movie and calculate
the number of frames as follows: lengt_in_seconds * framerate = number_of_frame.
The other solution is to load the movie in ReMpeg2 using a streamlist.
However the first line in that streamlist must say "CFFL" in
the first line and nothing else.. the rest is like a normal streamlist.
Press the Open button in the Main windows or ReMPEG2 and select your streamlist.
After a while ReMPEG2 will have finished analyzing the file. The click
on the main tab again and you'll see something like this:
The
no. of frames is what's interesting here... enter that value in
FlaskMpeg's Output Option in the General tab... you'll find the right
place.
As you can see this is a 25 FPS source and the number
of pictures and frames match. In case of a progressive NTSC source you
could see that those two number actually differ because the movie were
24fps and the pulldown flag set resulting in 29.97fps.
Now it's time to chose the encoder plugin. The most obvious choice is
the bbMPEG encoder since it's already included in the FlaskMpeg package.
>>
Read more about
CCE PLUGIN
PANASONIC PLUGIN
Then select Run - Start Conversion.
Here
bbMPEG shows you what you're going to get. It usually complains when you
set the wrong resolution, bitrate, etc. So change the settings press the
Settings button.
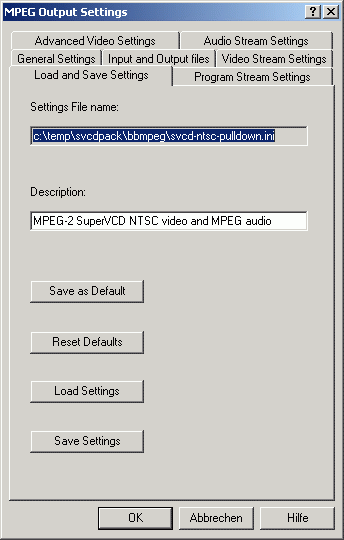 To
make your life easier I've included Pre-Built Settings for PAL, NTSC and
NTSC with pulldown SVCDs and for VCDs as well. In case of a progressive
source (e.g. you have chosen 23.976fps above) select the pulldown settings.
Not that pulldown only applies to NTSC sources in any case. Just go to the
Load and Save Settings Tab, press Load Settings and chose the correct File.
In the General Settings tab you can chose if you want to multiplex the file,
if you're going to cut the file afterwards there's no need to do that. In
the Input and Output files settings you can set the filename and path of
the output file(s). You can also decide to keep the video and audio stream
after multiplexing for later use.
After that press OK and then Start in the main bbMPEG window. Watch as it slowly encodes...
BTW: These setting files have been made for bbMPEG 1.24b15.. they may not work in another version.
These settings for SVCD are VBR at 2376KBit/s. You can change these settings to another bitrate by clicking on the Video Stream Settings tab. Please not that bbMPEG will somehow encode the same frame twice due to it's VBR.. so there's no reason to worry. VCD has of course fixed bitrates for both audio and video: 1150kbit/s and 224kbit/s respectively. For SVCD you can reduce the audio bitrate if you like.
The formula to calculate the size of the final video is:
(video_bitrate+audio_bitrate)*lenght_in_seconds/8=final_size. To calculate
how much you can fit on a CD it goes like this: (CD-size*1024) / ((video_bitrate+audio_bitrate)/8)
= number_of_seconds_for_a_cd.
CD-size is 740/820MB (for a 74/80min CD respectively). This is larger
than the usual CD size due to the fact that VCD and SVCD can be burned
in mode2.
Step 4: Cutting the Video into CD Sized pieces.
TMPG comes to our rescue here. It's MPEG tools allow us
to cut MPEG1/2 video easily.
If you intend to use I-Author you now have to demultiplex the
files you just created...
>> Read more about
CUTTING
DEMUX
I-AUTHOR
Step 5: Burning the movie
Unfortunately I don't have any standalone player that could play SVCDs.. so I tested all my disks only in WinDVD and the Real Magic DVD Station where they played fine. Fire up Nero and Select Super Video CD (you have to start creating a new CD.. the close the wizard and you'll end up with this window). If you have a VCD simply chose Video-CD. Other programs like WinonCD or EZCD can of course also be used to burn VCDs
In the resulting window just drag your multiplexed mpg file from the explorer-like window to the compilation window. Nero will then check if the file is ok to burn.. if it complains usually something is wrong.. If you followed my guides there should be no problem.. I tested several clips and they all worked the way I described here. Then burn the CD as usual.
Step 6: Playback
Ready to roll? Now is your big moment. Now you might find out why PCs are almost always better than consumer electronic products. Your pc will play almost any files, no matter if they correspond to whatever specs but your standalone won't. If everything works fine you can leave now but it might happen that the file you've created is choppy. In that case something went wrong while multiplexing. If you got an error like SCR > PTS or DTS it might then be that the file won't play correctly in your DVD player, however it usually works fine nevertheless. But if it doesn't that means you're screwed and have to reencode the movie again, and use another bitrate...
I have to admit that here I'm at a real lack of experience since I wasn't able to test my SVCDs on a standalone.. but I presume that since they worked fine in a software and a hardware player they should work in a standalone, too.
Credits
The following people greatly helped me in my quest of making SVCD guides: IEATLINT, TheBeagle and Inwards. Shots also go out to Robshot and all the other people in the scene who do some serious work.