Professional DVD Authoring
As you know my goal for miniDVD always was to create the perfect imitation of "The Matrix". In order to achieve this goal I tried out several DVD authoring tools, which all were in some way limited and did not allow the sophisticated operations necessary to create good-looking animated menus.
Scenarist NT is a tool commonly used by Hollywood studios to create their DVDs and it's THE program for DVD authoring. It's probably needless to say that since it incorporates the full range of the DVD specs it's really hard to master. So if you're serious about DVD authoring then read on, otherwise there's plenty of other DVD authoring programs which allow you to make more or less sophisticated DVDs with less effort.
Step 1: Preparing the assets
Here good planning is the key to success. It's best that if you look at some commercial DVDs, and then decide what you're going to do for your own mini/DVD. You'll undoubtedly have to make a lot of screenshots of the DVDs menus and you should be familiar with the basics of image editing in order to create the menu overlay effects used for menus. Encode all your video assets at the same resolution, cut the menus to have menu transition videos, main menu loop, etc. The probably hardest part, at least if you start out, is the subpicture overlay for the menus. Although the manual describes more or less how it has to be done, it lacks an illustrative example. Basically a menu is composed like this: There's a static/animated background, then a subpicture overlay (a 4-color bitmap having the same size as the background), and a selection layer where you can draw your buttons. To find out more you'll have to read step 2 and the manual. It's generally a very good idea to read the Scenarist manual about 3 times before you start using the program. It's really hard to understand at times but together with this guide which uses a well-known example you should manage to learn the basics.
To learn more about encoding assets look at the miniDVD guide.
Step 2: Creating Menus
Creating an animated menu: Here's where my problems began. I really thing Daikin should rewrite their manual for that operation, it's just incomprehensible. In any case I'll try to make it a lot better than they did. First of all you'll have to register your asset in the Scenario editor by dragging and dropping a video track from explorer on a title folder. This will create a new PGC:
 Ignore
the purple lines for now, they're only important later in the project.
If you have not linked any elements there will be only black lines in
the Scenario editor for the moment.
Ignore
the purple lines for now, they're only important later in the project.
If you have not linked any elements there will be only black lines in
the Scenario editor for the moment.
Next, click on the PGC you've created once, right click, and select Edit
track. This will switch to the track editor. You can now add an audio
track to the video by simply dragging and dropping the audio track from
Explorer into the Track editor, right below the video track (you'll see
where you can drop it). Then you'll have to add the subpicture, and here
your graphic editing skills come into play. Let's take a look at the chapter
selection:
 Now
when a scene is selected the gray area around the video will change to
a semi-transparent green. When one of the menu pages is selected (1-6,
7-12, etc), there's a green dot besides the selection, and when one of
the 3 buttons at the bottom is selected the color will be a semi-transparent
green.
Now
when a scene is selected the gray area around the video will change to
a semi-transparent green. When one of the menu pages is selected (1-6,
7-12, etc), there's a green dot besides the selection, and when one of
the 3 buttons at the bottom is selected the color will be a semi-transparent
green.
You will now have to create a 4-color bitmap that contains
all the areas that will change color when selected. Here's an example
for this menu screen:
 As
you can see I haven't recreated every element but it should give you an
idea of how things work. You'll have to use a different color for every
element that has another selection color. The standard for these overlay
bitmaps is background = white, and black, blue and red for the selection
items. When you drag and drop the subpicture overlay image from explorer
to the Track editor you'll be asked as what the picture should be registered.
Choose subpicture with forced start, since one should not be able to turn
it off, otherwise no menu selection would be visible anymore. Then select
View, Simulation Window.
As
you can see I haven't recreated every element but it should give you an
idea of how things work. You'll have to use a different color for every
element that has another selection color. The standard for these overlay
bitmaps is background = white, and black, blue and red for the selection
items. When you drag and drop the subpicture overlay image from explorer
to the Track editor you'll be asked as what the picture should be registered.
Choose subpicture with forced start, since one should not be able to turn
it off, otherwise no menu selection would be visible anymore. Then select
View, Simulation Window.
Now it's time to create the buttons.
![]()
This buttonbar will be very useful for the moment. The button right of the arrow button allows you to draw buttons. Use it to draw a rectangle around the gray areas in the menu, as well as around the chapter page selections and the 3 buttons at the bottom. Since my subpicture overlay bitmap does not contain all selection I only made the buttons I use.
 It's
probably a bit hard to see but if you look closely you can see the 7 buttons
I created. To link to buttons you can either use the 4 buttons right of
the drawing button, the ones with a small plus at the bottom. These 4
buttons allow you to make links from one button to the other. For instance
the red arrow creates a previous link, so if you press the previous button
on your remote the player will select the button where the red previous
link will point to. For instance: You can see a previous link from the
first button to the last one (main menu.. at the bottom). So if button
number 1 is selected and you press the previous button, the main menu
button will now be selected. An easier way to create this links is to
use Scenarist's auto route function which usually works quite well.
It's
probably a bit hard to see but if you look closely you can see the 7 buttons
I created. To link to buttons you can either use the 4 buttons right of
the drawing button, the ones with a small plus at the bottom. These 4
buttons allow you to make links from one button to the other. For instance
the red arrow creates a previous link, so if you press the previous button
on your remote the player will select the button where the red previous
link will point to. For instance: You can see a previous link from the
first button to the last one (main menu.. at the bottom). So if button
number 1 is selected and you press the previous button, the main menu
button will now be selected. An easier way to create this links is to
use Scenarist's auto route function which usually works quite well.
 This
will try to create the links for you. If you're not happy with the links,
you can select a button (make sure the white arrow button is selected,
otherwise you'll be drawing buttons or making links), then right click
and remove links:
This
will try to create the links for you. If you're not happy with the links,
you can select a button (make sure the white arrow button is selected,
otherwise you'll be drawing buttons or making links), then right click
and remove links:
 Clear
will get rid of the selected buttons, the Remove XY Link command removes
the XY link.
Clear
will get rid of the selected buttons, the Remove XY Link command removes
the XY link.
Last but not least you'll have to define the color mapping for your subpicture
overlay bitmap:
 You
can only access this menu if you have already defined your buttons. Select
Subpicture and Highlight and go to the Colors selection. What you can
see on the left is the color mapping. As you can see Scenarist uses the
default 4 color palette for subpictures, you can change that when you
first create a new project or later on but the easiest is to simply use
these 4 colors in the subpicture. The blue dots of my image will be mapped
as follows: when the button is not selected Display color is blue, but
intensity 0, which means that nothing will be displayed, the button is
transparent. When it's selected the blue button will become a green button
with no transparency (intensity at 100), if you press the enter button
on the remote when the button is selected the dot will become non-transparent
red. The red and black components will behave much the same but they have
no action color and they are semi-transparent (intensity is lower than
100) so you'll actually see "thru" the button and you'll still
see the menu background picture / video.
You
can only access this menu if you have already defined your buttons. Select
Subpicture and Highlight and go to the Colors selection. What you can
see on the left is the color mapping. As you can see Scenarist uses the
default 4 color palette for subpictures, you can change that when you
first create a new project or later on but the easiest is to simply use
these 4 colors in the subpicture. The blue dots of my image will be mapped
as follows: when the button is not selected Display color is blue, but
intensity 0, which means that nothing will be displayed, the button is
transparent. When it's selected the blue button will become a green button
with no transparency (intensity at 100), if you press the enter button
on the remote when the button is selected the dot will become non-transparent
red. The red and black components will behave much the same but they have
no action color and they are semi-transparent (intensity is lower than
100) so you'll actually see "thru" the button and you'll still
see the menu background picture / video.
I hope that was clear enough.. as I said that was the most difficult part for me to figure out.
![]()
The 4th button from the left will switch to simulation mode.
![]()
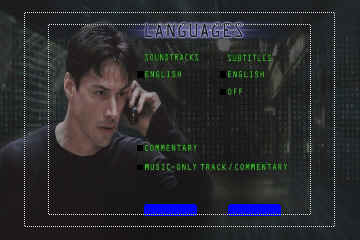
Press the play button, then you can use the 5 blue arrow buttons to navigate around your menu and see if you get the effects you desire. If you've defined links for the Title, Menu and Return buttons on the remote these buttons will also be simulated. Here's an example of how the menu I just created looks like:
 As
you can see I should've made a nicer subpicture bitmap but at least you
can clearly see the effects.
As
you can see I should've made a nicer subpicture bitmap but at least you
can clearly see the effects.
Once you're done, close the simulation window. The track window will now
look something like this:
 As
you can see we have our video track, audio track, subpicture track and
a highlight track. If you want, you can also set a start time for the
subtitle. This is useful for the main animated menu of "The Matrix"
where no selection should be possible for the first 23 seconds.
As
you can see we have our video track, audio track, subpicture track and
a highlight track. If you want, you can also set a start time for the
subtitle. This is useful for the main animated menu of "The Matrix"
where no selection should be possible for the first 23 seconds.
 Simply
click on the subpicture stream in the Track editor, then at the bottom
in the property window you can enter a start time. The same can also be
done in the Simulation window if you select Subpicture and Highlight,
then Image and go to Play.
Simply
click on the subpicture stream in the Track editor, then at the bottom
in the property window you can enter a start time. The same can also be
done in the Simulation window if you select Subpicture and Highlight,
then Image and go to Play.
The creation of still menus is not a lot different, you simply drag and drop a bitmap to the current Title in the Scenario Editor and you'll be asked how you want to register your bitmap:
 Since
we're creating a menu you'll have to select Still Menu. Then a link from
the Title to your new menu will be created. You can then add audio tracks,
subpicture overlays and define buttons as usual. Here's an example for
the audio menu:
Since
we're creating a menu you'll have to select Still Menu. Then a link from
the Title to your new menu will be created. You can then add audio tracks,
subpicture overlays and define buttons as usual. Here's an example for
the audio menu:
 Here's
what the menu looks like when nothing is selected. Grab that screen in
your DVD software player.
Here's
what the menu looks like when nothing is selected. Grab that screen in
your DVD software player.
 Then
we need a subpicture overlay which contains all the active elements. In
that case we have 5 squares which will be green when activated plus the
two main buttons, which will be transparent green when selected and transparent
red when you click on them. Again, I chose to use default colors to make
color mapping easier.
Then
we need a subpicture overlay which contains all the active elements. In
that case we have 5 squares which will be green when activated plus the
two main buttons, which will be transparent green when selected and transparent
red when you click on them. Again, I chose to use default colors to make
color mapping easier.
As said above, you have to import a bitmap image of the menu background
into the scenario editor of Scenarist. You'll then be presented with the
dialog box above where you select still menu. Then right clock on the
new PGC and select Edit Track.

Here's the PGC you've just created in the scenario editor. Now it's time
to overlay the subpicture track so go to the track editor.
Drag & drop the subpicture image on the crack containing your menu.
Then go to the simulation mode (view - simulation). Here's what you get:
 You
can already see the elements of the subpicture overlay. Now you have to
draw your buttons.
You
can already see the elements of the subpicture overlay. Now you have to
draw your buttons.
 The
next step is linking these buttons to each other, that is to define what
happens when you press the right button on your remote, and the same goes
for the up, down and left buttons. The easiest way is, as said before,
to use the Auto route function. Here's what you get when using it in our
example:
The
next step is linking these buttons to each other, that is to define what
happens when you press the right button on your remote, and the same goes
for the up, down and left buttons. The easiest way is, as said before,
to use the Auto route function. Here's what you get when using it in our
example:
 Do
you like all these colorful arrows <g>? In any case now we're ready
to link the buttons to some action. Then once again we have to assign
some color mapping:
Do
you like all these colorful arrows <g>? In any case now we're ready
to link the buttons to some action. Then once again we have to assign
some color mapping:
 As
you can see the blue parts of the subpicture overlay will become slightly
transparent green when selected and transparent red when being clicked
on. The black part will become opaque green/red.
As
you can see the blue parts of the subpicture overlay will become slightly
transparent green when selected and transparent red when being clicked
on. The black part will become opaque green/red.
After making these choices close the simulation window
and go back to the scenario editor.
 You
can see that the PGC now has a new element called Btns. It's white which
means that no button action has been defined. If you remain on it with
your mouse for a couple of seconds you'll be shown the defined actions
for each button: Nop means no action. Double clock on the Btns flag will
bring you back to the Simulation window.
You
can see that the PGC now has a new element called Btns. It's white which
means that no button action has been defined. If you remain on it with
your mouse for a couple of seconds you'll be shown the defined actions
for each button: Nop means no action. Double clock on the Btns flag will
bring you back to the Simulation window.
 Here
you can get in touch with the full capabilities of Scenarist. What I'm
going to explain for now is only a very slim part of it. When you begin
you'll have the Nop command assigned to each button. Select one button
by clicking on corresponding number, then in the Command drop down list
select an action. As this is the language menu we'll always select Set
Angle/Audio/Sub-picture and set to Immediate.
Here
you can get in touch with the full capabilities of Scenarist. What I'm
going to explain for now is only a very slim part of it. When you begin
you'll have the Nop command assigned to each button. Select one button
by clicking on corresponding number, then in the Command drop down list
select an action. As this is the language menu we'll always select Set
Angle/Audio/Sub-picture and set to Immediate.
For the different audio tracks simply activate Set Audio Stream ID to X where X represents the soundtrack in the order as they have been added to the main in the track editor. You can also define a post Link command. Pressing button 1 in that menu will result in the following: Audio will be set to the first stream and the main menu will be called. If you want to activate a subpicture with a button then check Set Subpicture Stream ID to X and then you can also check Display Subpicture.
When you have defined actions for each and every button
you can close the simulation window. Another possibility to link buttons
is to click on the btns flag in the scenario editor, keep the mouse clicked
and drag it to another PGC. This will create a link and you'll be presented
with a representation of your menu with the buttons on it where you can
chose which button will be used for the assigned command. Later on I'll
have some pictures on that way of linking.
The main movie will be inserted the same way as an animated menu. You can then also add audio tracks to the video in the Track editor. Also add an empty subpicture track by selecting New - Subpicture Stream from the main menu. Then go to the simulation window and press the purple button that has a T in it (4th button from the right in the first row of buttons). This will bring up the subtitle editor. Since the format of subtitles is not contained in the documentation that means we have to create our proper subtitles.
![]()
This buttonbar will allow you to select the properties of your subtitles. The button will create a new subtitle on the video stream. Forward to the position where you want to insert the first subtitle, then press the purple button shown above. This will create a textfield over the video, which you can resize to fit your needs. Select a font, fontsize, font properties and the alignment with the buttonbar above.
 Oops...
an error. But the point is to show you how it looks. To create a new line
you'll have to press Shift+Enter. When you're done forward the video for
at least 4 seconds. The sub will then be saved. Interestingly when looking
at the timecodes extracted with Subrip, the subs in "The Matrix"
were also at least 4 seconds long. Coincidence or were they using Scenarist
as well?
Oops...
an error. But the point is to show you how it looks. To create a new line
you'll have to press Shift+Enter. When you're done forward the video for
at least 4 seconds. The sub will then be saved. Interestingly when looking
at the timecodes extracted with Subrip, the subs in "The Matrix"
were also at least 4 seconds long. Coincidence or were they using Scenarist
as well?
Repeat the process until you've defined all your subtitles. Then it's time to define the colors for the subs:
 You'll
probably know the menu by now. The default settings shown here are really
ugly. Clearly we want to have white subtitles, so set E1, E1 and P to
white, 100% intensity. That way to subs will be shown in a nice white,
as on most DVDs on sale today.
You'll
probably know the menu by now. The default settings shown here are really
ugly. Clearly we want to have white subtitles, so set E1, E1 and P to
white, 100% intensity. That way to subs will be shown in a nice white,
as on most DVDs on sale today.
Then when you've defined all your subtitles, go back to the track editor.
You'll see that the subpicture stream now contains a lot of small sub
parts:

Click on one of these gray parts in the subpicture stream (each represents one subtitle). Then in the property window you can define the length of the sub, the default is 2 seconds:
Step 3: Defining chapters
Go to the track editor and drag&drop your main movie into it. Then add audio channels, and subtitles.
At the very bottom of the screen you can see the Scenes timeline. You can move the gray slider around and then press the Make Scene button. By selecting a scene placeholder you can also set the start time more accurately in the property browser:
And here's the buttonlist to be used to create Scenes:
![]()
The 2nd button from the right creates an new scene, the one with a camera on it creates a new angle, the one with a speaker a new audio channel and the one to the right a new subtitle stream.
 For
each scene you add another icon will be added to the track representation
on the left site of the main window. You can also find the tracks in the
assets part of the window on the bottom right:
For
each scene you add another icon will be added to the track representation
on the left site of the main window. You can also find the tracks in the
assets part of the window on the bottom right:
 Now
go back to the scenario editor and drag&drop the track you've just
created to your current title. When you now double-click on the PGC
you'll get a list of your defined scenes. You can now create drag&drop
links to your chapters in the scenario editor. You can read more about
that procedure in step 4.
Now
go back to the scenario editor and drag&drop the track you've just
created to your current title. When you now double-click on the PGC
you'll get a list of your defined scenes. You can now create drag&drop
links to your chapters in the scenario editor. You can read more about
that procedure in step 4.
Step 4: Defining the navigation
By default the First Play Item will be linked to the first Title. But then it's up to you to define what happens during playback. Scenarist allows you to define Pre, Post, Buttons, Cell, etc commands. The Pre command will be executed before the PGC is being executed, the Post command will be executed after playback of the PGC in question and the button commands define actions for buttons.
![]()
These buttons allow you to define links. The PGC with a red arrow showing to the left creates a previous PGC link, that is a link that will be executed if you press the previous button on your remote. The blue arrow is the opposite, it defines a next link. The green arrow defines the action when you press the Return button on your remote. The purple button, finally, defines a link. So for instance we want to link our main menu to other menus and to play the main movie. So you'll have to click on the btw tag of the PGC representing the main menu in the Scenario editor, keep the mouse button pressed and drag the arrow to another PGC, for instance the main movie. Let go of the button and you'll be asked what kind of link to create:
 It
is possible to have a whole chain of commands attached to a button as
you can see. For now let's just create a simple post command. Then the
simulation window will open and you'll have to click on the button to
which you want to associate the link you've just created. In the end it
looks something like that:
It
is possible to have a whole chain of commands attached to a button as
you can see. For now let's just create a simple post command. Then the
simulation window will open and you'll have to click on the button to
which you want to associate the link you've just created. In the end it
looks something like that:
I hope this image helps to illustrate my point. The PGC on the left is my main animated menus with 4 buttons, but so far I've only created 3 button links. You click Btns besides the PGC, drag a link to another element, for instance the PGC called transition1-audio_1-t-pgc which is a transition menu and to which I've associated a post link which points to the animated chapter selection PGC. Another link goes from the main menu to the dreamworld static menu, for which I have yet to define any buttons and then associate any action. If you'll actually create the whole menu you'll end up with a very confusing screen, hence you can put different stuff in different titles, and you can "open and close" a title, which means that all the elements of a certain title will be visible / not visible. Just double click on Title_1 and you'll see what I mean.
Step 5: Mastering the DVD
After having authored the DVD it's time to test-drive it. Go to the Layout editor:
 Chose
DVD Video as format, then chose a Target Directory, check Create DVD Video
and Create Disc Image. The default sector size of 2048Bytes is okay. Since
I don't have enough money to even consider having my own DVDs mastered
I will not talk about Dual Layer stuff here. If you're interested please
refer to the manual. The PDVD Editor allows you to set some properties
of your disc.
Chose
DVD Video as format, then chose a Target Directory, check Create DVD Video
and Create Disc Image. The default sector size of 2048Bytes is okay. Since
I don't have enough money to even consider having my own DVDs mastered
I will not talk about Dual Layer stuff here. If you're interested please
refer to the manual. The PDVD Editor allows you to set some properties
of your disc.
<sarcasm>As you can see I don't have a CSS license
and can therefore not scramble my discs. I must say that this really bothers
me. I want to protect my work against petty pirates, who rob me of my
life's work.</sarcasm>
 The
Volume Name will be the name of your DVD. But if you intend to play it
on a standalone all these info will be pretty useless. Close this window
and press the Start button and get really mad about the stupid error messages
which nobody really understands.
The
Volume Name will be the name of your DVD. But if you intend to play it
on a standalone all these info will be pretty useless. Close this window
and press the Start button and get really mad about the stupid error messages
which nobody really understands.
Scenarist is a usability nightmare.. there should be at least some sort of precheck as for instance in DVDMotion where you can always check if you have invalid links and stuff during authoring.
If everything has worked out you can now burn the disc as described in the miniDVD guide.