miniDVD Guide
First of all a warning: This is no beginners guide. A miniDVD has to be mastered much like a DVD and if you know the pay somebody working in DVD authoring gets then you know why. Newbies leave please! Also.. to get a full fledged miniDVD (one with Menus and multiple audio tracks) there's no way around using some commercial software. Unfortunately this kind of software does not come cheap and most demos you can get are not suited for the task (because they are seriously crippled). Fortunately we should be able to use our favorite CD burn software since a miniDVD is nothing but a DVD mastered on a standard CD.
This guide does only cover Windows NT / 2000. Microsoft's pocket calculator OS Windows 9x/ME is simply not suited for the task since we're going to handle files that can be significantly larger than 2GB so if you haven't upgraded yet then it's time to do so now. I can tell you it's really worth it. You'd have to put a gun to my head to make me replace my W2K by Windows ME - I'm not kidding here.
Step 1: Preparing the video source
Since a miniDVD uses MPEG-2 video you can create your video track very much the same way as you would make an SVCD. The difference is that you are now free to set any bitrate you want. There are also several different resolutions you can chose: 720/704/480/352x480/240 or 576/288 (the latter vertical resolutions are for PAL). The 480 horizontal resolution as borrowed from SVCD and considered experimental for the moment.
You can spare yourself the splitting trouble by do some quick calculations before en/transcoding: You'll be setting an average bitrate for the video and a bitrate for the audio - the latter is constant bitrate. ( video bitrate + audio bitrate ) * length in seconds = filesize. I don't know why most people don't come up with that themselves but here's how it works in any case. So simply set the number of frames (number of frames = length in seconds * frames per seconds) to encode (last tab in the FlaskMpeg MPEG options) in FlaskMpeg according to your calculations. There's no way to begin the 2nd or 3rd part by a given framenumber so far.. but this will eventually be implemented. Just use the FlaskMpeg player (Run - Player), then use the slider to set your starting position.
>> DECRYPTING
>> ENCODING
Step 2: Preparing the audio source.
You can of course take WAV or MP2 soundtracks but the real goal of miniDVD is to have a fully fledged AC3 soundtrack, eventually lower the bitrate. You can read more about transcoding AC3 in another guide. That guide will also explain you how to demultiplex the ac3 track from a VOB source.
Step 3: Calculating the bitrate
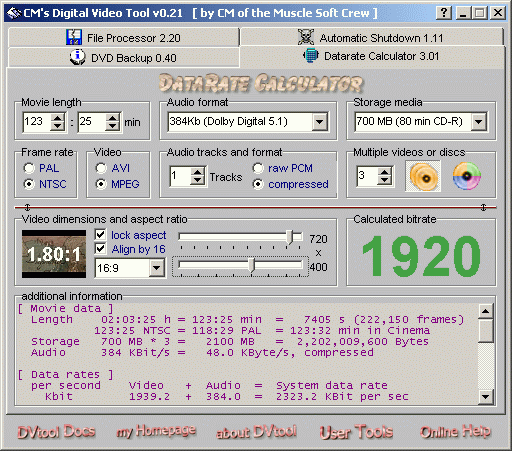
Launch DVTools and go to DataRate Calculator. Then click on the thin read line that separates the the upper part where you can enter the movie lenght, audio format and storage media from the rest.

Step 4: Multiplexing m2v and ac3
This is where it gets a bit more complicated. Depending on your DVD mastering program it will request a multiplexed VOB or separate m2v and ac3 files. Although bbMPEG is supposed to be used for DVD creation and the VOB was accepted by my authoring software the resulting miniDVD would have no sound, but only when playing in DVD mode. In file mode the soundtrack was there. I currently have no clue why.
Fortunately for us the freely available DVD Quick Builder Demo includes a multiplexer which is a bit more limited (e.g. no subtitle channels and no multiple audio tracks) but which has one major advantage: it's for free. If you prefer to use this multiplexer skip the following.
Let's assume that you'll have to multiplex audio and video. Most authoring programs either come with StreamWeaver or will request a StreamWeaver multiplexed file (can you say monopoly?).
Simply set a name for the output file, load your video and audio track. More sophisticated authoring program will allow you to use multiple audio tracks but the demo of DVD Quick Builder I used does not (however it allows for unlimited length in video and audio.. something all other demos don't) so don't bother with multiple audio tracks.. you'll have to get a $250+ authoring software to be able to use multiple audio tracks... most authoring software costs even $2000+. When you've loaded the m2v and ac3 press Resolve TC. If StreamWeaver bitches let it bitch.. the source I used was perfect and in no way was there such a discrepancy between video and audio length as shown in the file. If you experience the same simply put the higher value into both Out positions. To do so double click on the video track which will call the following window:
Select
Edit Time Codes
Enter
the Out position of the audio track in the lower fields and check Protected.
This will force StreamWeaver to force our values. This step has already
been suggested in the original 12 step miniDVD creation guide (and that
was a long time ago) so I think we can safely do that... playback worked
fine in any case.
To define chapters double click on the first chapter and assign another
stop time than the default one (the default chapter will go from the first
to the last frame). This will create another chapter which will go from
the just assigned end position of the first chapter to the last frame.
Proceed until all chapters have been set.
Then press Make. Make sure you've selected the right video format. StreamWeaver will completely block your system for an insane long time (bbMPEG takes at least half as long... but as I said.. we're having a monopoly situation so no choice at all). StreamWeaver will create a whole bunch of additional files together with a VOB file. Don't touch these additional files, your authoring program might need them.
Press Convert video/audio streams to VOB file.
Press
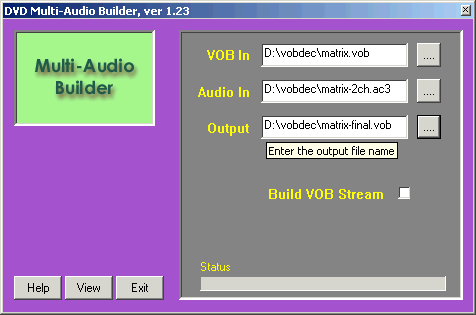
on the buttons with the 4 dots to load a file. To load an m2v video file
you must select all files as file type, otherwise only mpv and VOB streams
will be shown. If you've loaded audio and video and set an output name
then check Build VOB Stream (this will actually start multiplexing).
The included multiplexer does not contain all the functions
of the full version but it's enough to make a first miniDVD.
You can also insert multiple audio tracks using DVD Quick Builder: Select
Insert Multiple Audio Streams:
 Select
an already multiplexed VOB, another AC3 file and an output file, then
try to check Build VOB Stream and your file will be created.
Step 5: Cutting
Thanks to Odedia who provided this method which is quite a bit simpler than my initial method.
VOB files have to be smaller than 1GB. A CD, however, is smaller. There's a hacked version of StreamWeaver that will split VOBs at 640MB but even that version has some problems since only the first VOB will be accepted by an authoring tool. Hence we have to trick the authoring program:
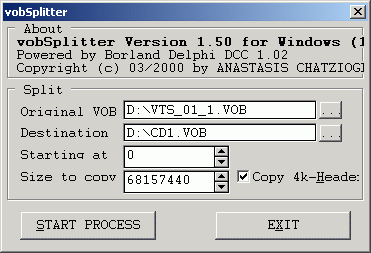
Download FileMerger, and merge all the VOB files together, in the right order. Then start vobSplitter.

It's also important that you check Copy 4k-Header, otherwise your files won't work. For the second file simply set starting at to 681574400, and for the 3rd one to 2x681574400, etc.
When you're done test the VOBs in a software DVD player. If they won't play then you have to split at another position and try to play them again . If everything works out you're ready for the next step.
Step 6: Authoring
There are many very expensive authoring software and none that I would really call affordable. The cheapest I could find was DVD Quick Builder from Bernclare and even that was $250. Considering that I paid considerably less for my W2K and I use that every day, well... I leave it up to you which program you chose and how you get it. Here's a list of DVD authoring programs: Sonic DVD IT, DVD Quick Builder, CD Motion for DVD Video, Scenarist NT, etc. For my tests I used DVD Quick Builder 2.15.
You can find a guide on DVD Wise from the same manufacturer as well.. but you should have read this guide first since the other is based on this.
In the DVD Quick Builder demo which you can download for free the following options are disabled: Insert Multiple Audio Stream, DVD Styles 2,3 and 4, and Create Premastering File. So whenever I talk about one of these options and you only have the demo ignore it. In this tutorial we're going to make a simple miniDVD with 2 menus and one Title. You could also have two titles and only one title but I prefer menus. Check DVD Style 3, then press on Title (I'm talking about the lower right part of the DVD Quick Builder window btw). You can then indicate the VOB file you've created.
If you have the demo you'll have to select First Title as default pointer since you cannot create menus. Otherwise the connection pointer indicates where the player will jump to after it has played the VOB. Chose First menu so the main menu will come up again after the movie is finishes - much like on your DVDs. Select Display option Letterbox if you have a 16:9 source. You can also assign a language to the individual audio tracks. If you only have one track, the settings for Audio 2,3,etc will, of course, have no effect.
In Chapter Selection you can create chapters:
You can either enter timecodes manually - just check Timecode - Manual Selection to so do - or play the VOB and select your chapter stops during playback. Start playback and press Select whenever you want to make a chapter. To delete a chapter again simply double click on it. When you're done press OK. If this is the first program run (where you set chapters according to split times) you can jump ahead to building the miniDVD.
Then we're going to create some fancy menus. Since DVD Quick Builder is a rather small program it's not designed for advanced projects, so you can only have still menus, and no audio in the background. But until very recently the majority of DVDs didn't have that kind of stuff either. Press Menu1, and load a bmp file which will be your main menu. You can make screenshots of your menus in your DVD player for instance. The following dialog will pop up:
This
are the properties of the menu page. Connection point means where the
menu will jump to after the still time has run out. If you want the menu
to be displayed indefinitely then select 255. Otherwise you can select
a number and assign a connection pointer - this will have no effect if
you set still time to 255. You can also set a language for your menu.
Then
click on the image once, which will enable the rightmost button in the
buttonbar of DVD QB (the ping square). Then you can use your mouse to
draw squares in the picture which represent the active area. Double click
on a drawn area will bring up the following:
You
can attach a command to each area. You can chose to jump to any chapter
in the movie in either title one or two (provided you have two), play
the whole title one or two, or jump to another menu. For instance I did
associate the Scene selection area in the above picture to Second Menu
since I want to create a menu which allows me to select the different
chapters I created. Color contrast will allow you to set how the area
will look when it's selected, the whole area will be overlayed with a
transparent color of your likes when it's active.
Welcome
to my chapter selection. It's really hard to see but I've selected the
various images and associated each to a different chapter. I've also associated
Start movie to First Title, Play All and Main Menu to Menu 1.
The last step is creating the DVD files on your harddisk for testing. Press the corresponding link (Create DVD Files on Hard Disk Drive for Simulation) in the left frame in the main window.
First
Play Pointer is First Menu or in the case of DVD QB Demo or a miniDVD
without a menu it's First title as shown on the left. You can screw yourself
with region settings if you like but that's up to you. You'll also have
to select where the DVD will be created. Make sure that the disk you chose
has enough space (and no this is not burning... the files will of course
be on your harddisk afterwards) Then press Build.
After a while you'll have an AUDIO_TS and VIDEO_TS directory on the drive you've selected and in the VIDEO_TS directory you'll find some BUP, IFO and VOB files.
Now start up your DVD software player and change the default drive to the drive you've created your test-DVD on. PowerDVD does not allow this operation but WinDVD and DVD Station do. Strangely WinDVD would not play correctly and DVD Station would take some time to load but then it worked fine.
If you set your chapters according to split times it's
time to return to splitting.
If you have the full version of DVDQB then you can create an image to
be burned. This step is not mandatory, it works without so I leave it
up to you if you have the full version. If you have the demo you must
go directly to step 6. Maybe it's a bit safer to actually create the image...
it's hard to tell since both methods worked for me.
Select
the drive where you've created your simulation DVD in DVD Drive and a
name for the image file. The image will have about the same size as the
video_ts directory. You can chose a name for your miniDVD in Volume Title.
The click on the square right of Build DVD-R Image. After a while you
end up with an .img file which you can burn in Nero.
Step 7: burning the miniDVD
If you have created an image you proceed as follows:
Select
File - Burn Image.
Data
Mode 1 and Block size of 2048 Bytes are the defaut settings and that's
exactly what you need. Then press OK and burn the disc.
I'm not 100% sure whether these are the right settings for everyone. I suggest you use a CD-RW to verify..
I've used Nero 5.0.13 to burn an UDF/ISO hybrid disk (UDF only disks are unreadable unless you have some kind of special UDF software installed. I think DirectCD and other such direct write to CD tools use that version of UDF). Standard ISO mode is apparently also possible. To make this playable on the Affrey you have to ensure that the files are on the disc in alphabetical order! Other than that I suggest Robshot's article about miniDVD and the Affrey player.. it isn't so simple as it first looked.
Create a new CD-ROM (UDF/ISO) compilation. Then simply drag and drop the AUDIO_TS and VIDEO_TS folder to your compilation. Then burn the disc.
As mentioned above WinDVD simply doesn't like my miniDVDs... it can play the files in file mode but not in disc mode. However, PowerDVD, which didn't work at the time all the miniDVD tutorials I've seen so far were released, works like a charm and DVD Station as well.