MPEG-4 multipass encoding
A new way of encoding to MPEG-4 has emerged thanks to a Japanese software called m4c. Lotus m4c is an encoder that after encoding a frame once will analyze the encoded frame and compare it to the source frame and reencode in case the quality requirements sets are not fulfilled. It also includes a scene-change detection algorithm which will ensure that keyframes fall on scene changes which increases the quality of the output file. You no longer have to set keyframes to one each second but the encoder will intelligently set keyframes on it's own.
The original version of Lotus m4c was a command line based version. Along with it come several windows based tools to analyze block errors, edit AVIs and what I consider to be a Windows version of m4c but which always crashes on me. All the tools have yet to be translated. M4c has also been ported to an AVIUtl plugin. For those who haven't heard of it yet, AVIUtl is VirtualDub for Japanese people, or in other words a pretty powerful AVI editor. But as it's Japanese it's supports VFP and can therefore read the output of our favorite far eastern programs: DVD2AVI and TMPG. Furthermore these can read output files of AVIUtl as well. And of course you can convert the output of AVIUtl to a standard reference AVI using VFAPI Converter. Thanks to the author of DVD2AVI we now have an English translation of AVIUtl and Jester, the author of the m4c plugin for AVIUtl was so nice to provide a translated plugin and a translated readme. But let's cut to the chase.
Step 1: Rip the DVD and set up the frameserver
Since AVIUtl supports VFP we should do the obvious: use a VFP capable decoder, or in other words: DVD2AVI. First rip the DVD using an IFO parsing capable tool like SmartRipper. Then load all the ripped VOB files in DVD2AVI, select the right audio track and choose your audio conversion and normalizing settings, then save the project.
>> Read more about
SMARTRIPPER
DVD2AVI
Step 2: Setting up AVIUtl
The AVIUtl package that you can download from this site contains all the necessary software for this guide, as well as instructions on how to set up AVIUtl, as it's by default still in Japanese. Then you can simply load - Control O - the project file created by DVD2AVI (filename.d2v). Ignore all the options presented to you in the load dialog.
 At
first you may want to resize the picture to the desired resolution. Please
refer to the bitrate
and resolution guide for more info about calculating resolutions.
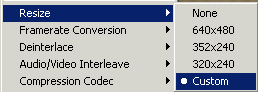
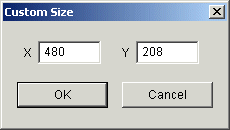
The resizing dialog is in the settings menu. Simply enter the desired
value in the field that will follow.
At
first you may want to resize the picture to the desired resolution. Please
refer to the bitrate
and resolution guide for more info about calculating resolutions.
The resizing dialog is in the settings menu. Simply enter the desired
value in the field that will follow.
Right now the image will look squeezed in the main AVIUtl window.

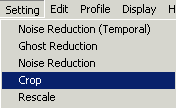
The next step is to crop the image. We'll simply get rid of all the black bars while staying at the set resolution.
 You'll
then see a small popup window where you can perform all the cropping whereas
in the main window you'll see the effect of your cropping.
You'll
then see a small popup window where you can perform all the cropping whereas
in the main window you'll see the effect of your cropping.
 If
you check the small checkbox in the top left you'll immediately see the
effects of your cropping settings. Increase the Top slider until the picture
matches the upper border of the window:
If
you check the small checkbox in the top left you'll immediately see the
effects of your cropping settings. Increase the Top slider until the picture
matches the upper border of the window:
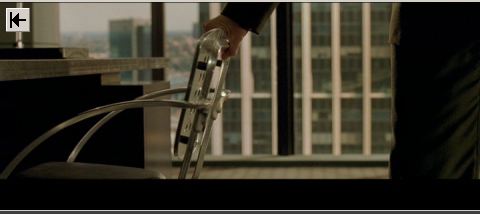
Your movie should now look like this:
If you perform the same operation for the Bottom slider you should finally end up with something like this:
Now that we have done that we're almost done. Since at the beginning you may want to experiment with the m4c encoder a bit it may not be the worst idea to limit the number of frames to encode. This can be done in two ways which closely resemble the way you would do it in VirtualDub. The first one involves using the buttons at the bottom of the main window.
![]()
Move the slider to the position where you want to start encoding and
then press the second button from the left. In the video window you should
now see the following sign: ![]() .
Do the same for the desired end frame by pressing the rightmost button.
Again a sign will be showed in the frame:
.
Do the same for the desired end frame by pressing the rightmost button.
Again a sign will be showed in the frame: ![]() .
.
Alternatively you can use the range dialog in the edit menu: Select Edit - Select processing range to bring up the following window:
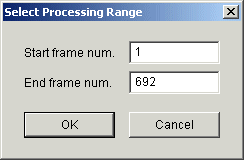 I
don't think I have to say very much about this dialog. Simply chose a
start and end frame. Just remember that by default AVIUtl starts counting
at 1, not 0. This can be changed in the General Settings if you like.
I
don't think I have to say very much about this dialog. Simply chose a
start and end frame. Just remember that by default AVIUtl starts counting
at 1, not 0. This can be changed in the General Settings if you like.
>> Read more about
GENERAL SETTINGS
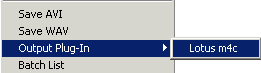
Then it's time to start encoding. In the File menu you'll find the output
plugins. Select Lotus m4c.
This will bring up the file saving dialog. Note that you can't select an audio compression. That's normal since the output plugin supports video only. Later on you can simply join the video with the audio track and compress the audio track as well.
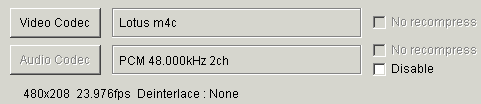
Pressing on Video Codec will bring up the m4c plugin configuration.
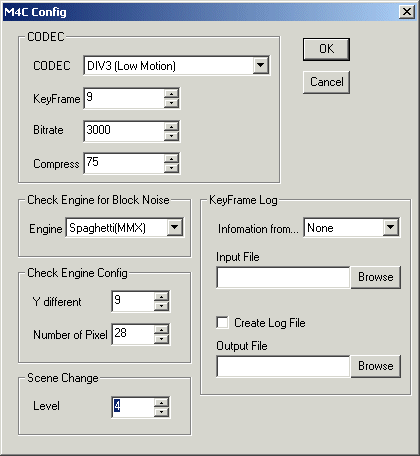 The
codec settings should not be too difficult for you to figure out. They
correspond to the exact same settings in the standard DivX codec. Chose
DIV3 for Low motion or DIV4 for High motion. As mentioned before you should
set a high keyframe interval. You can in fact go much higher than the
default of 9 since the encoder will automatically insert keyframes where
it's needed.
The
codec settings should not be too difficult for you to figure out. They
correspond to the exact same settings in the standard DivX codec. Chose
DIV3 for Low motion or DIV4 for High motion. As mentioned before you should
set a high keyframe interval. You can in fact go much higher than the
default of 9 since the encoder will automatically insert keyframes where
it's needed.
Chose the MMX block noise engine and configure the engine. Here's how the engine works:
Every frame is splitted into 8x8 pixel blocks and each block is analyzed separately for the following: If a pixel has an Y (luminance) value that's more than "Y different" away from the value of the uncompressed frame the pixel will be marked as bad frame. If there's more than "Number of pixel" of bad pixels in a block the block will be reencoded as a keyframe.
The Scene Change detection works like this: An evaluate value that's equal to "Level" * Image-Width *Image Height / 16 will be calculated. If the delta frame size is larger than that value the frame will be recompressed as a keyframe.
It's recommended that you set the level to at least 3 when you use it (0 means no scene detection), otherwise you'll get an incredible amount of keyframes.
Also note that you can't use DivX Fast motion even tough the option is present. That doesn't mean you can't select it, but the results will be unusable (way too big).
You can check Create Log File and provide a filename and then the log will be saved for later use - for instance you should share your settings with a friend which would then chose Information from File and select your file as Input File.
When you're done configuring press OK and in the main encoding window select Save. It will then encode at a speed that's approximately the same as FlaskMpeg.
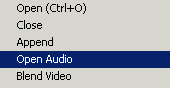
Step 2: Adding the audio
After the saving exporting has succeed load the AVI file you've just created in AVIUtl. Then load your audio file as well. The Open audio dialog can be found in the file menu.
If you haven't done it in DVD2AVI you can normalize your soundtrack by selecting Audio Normalization in the Settings menu.
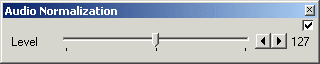
To activate the normalizing simply check the checkbox in the upper left and set your level. The more to the right you move the slider the louder the output volume will be.
Now you can save the AVI again while compressing the audio.
 Select
No recompress since you've already encoded the video. Chose your audio
codec by pressing on the corresponding button.
Select
No recompress since you've already encoded the video. Chose your audio
codec by pressing on the corresponding button.
And now the dream for everyone who can't get away with not getting credits for their encodes: You can select Title, Copyright info and a comment which will be shown in Windows Media Player during playback.
When you're done save the AVI.