FlaskMpeg and Avisynth
Make sure you don't just press ok the first time you start up FlaskMpeg, instead chose the right language in the dropdown list right above the OK button.
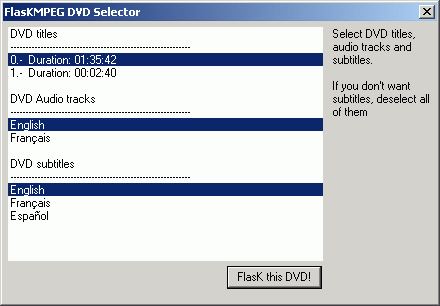 Start FlaskMpeg. Choose file - Open DVD and select the ifo file DVD Decrypter
has ripped. Select the title you want - generally the one that has the
longest duration.
Start FlaskMpeg. Choose file - Open DVD and select the ifo file DVD Decrypter
has ripped. Select the title you want - generally the one that has the
longest duration.
Also select the audio track you want to extract and subtitles. If you don't want subtitles simply deselect them.
You must have all vob files on your hard disk, otherwise ifo parsing won't work!
>> Read more about
ALTERNATIVE WAY

The picture shows PowerDVD running "The Matrix" in "Follow the white Rabbit" mode. You can see that this mode is title 6. If you select standard play the title would be Title 1. You can also find out what title the menu, the extras, etc have. As for how to find out how to select the right audio track you can right-click in the movie window, then select audio and you'll see which audio stream is currently being used. Make sure that you select the right audio stream in the DVD menu before playing back and the right subtitle and you should have no problem associating the right audio stream and subpicture stream in FlaskMpeg.
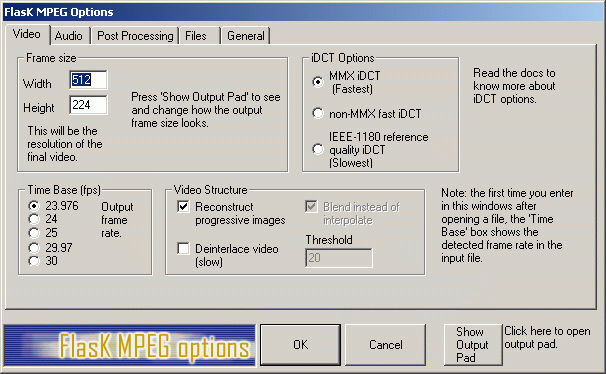
Now select Options, then Global
Project Options.
VCD allows the following frame sizes: 352*240 for NTSC and 352*288 for
PAL. Time Base is 25 for PAL and 29.97 for NTSC. You can skip
the following discussion.
SVCD allows more than just one frame size: In fact you can chose between
720/480/352 as horizontal resolution. The vertical resolution will always
be either 480 (NTSC) or 576 (PAL). The framerate is a bit more tricky.
PAL sources are always 25fps, regardless of what FlaskMpeg might detect.
NTSC can be either 23.976fps or 29.97fps.
 NTSC sources can be either 24fps progressive (detected as 23.976fps FILM),
29.97fps progressive / interlaced or 29.97fps interlaced. To find out
whether to set 23.976/24fps or 29.97fps you have to start FlaskMpeg's
integrated player. To do so, close the option Windows by pressing OK,
then select Run - Player from the main FlaskMpeg menu:
NTSC sources can be either 24fps progressive (detected as 23.976fps FILM),
29.97fps progressive / interlaced or 29.97fps interlaced. To find out
whether to set 23.976/24fps or 29.97fps you have to start FlaskMpeg's
integrated player. To do so, close the option Windows by pressing OK,
then select Run - Player from the main FlaskMpeg menu:
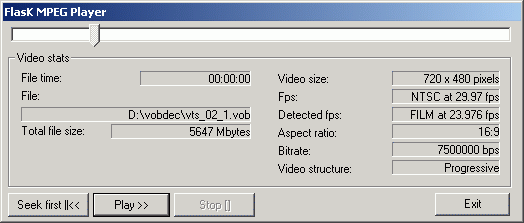 Start
playing and watch the Video Structure indicator on the left bottom side
very closely. If it stays Interlaced all the way you have to set Time
Base to 29.97 fps in the option window. You should always forward a couple
of minutes before making this test because some time the studio logo is
coded 29.97fps hardcoded but the main movie is progressive. If the movie
is progressive set TimeBase to 23.976fps. If the movie constantly
changes between progressive and interlaced then you're at a crossroads
here. I suggest you read about IVTC before you decide how to go on.
Start
playing and watch the Video Structure indicator on the left bottom side
very closely. If it stays Interlaced all the way you have to set Time
Base to 29.97 fps in the option window. You should always forward a couple
of minutes before making this test because some time the studio logo is
coded 29.97fps hardcoded but the main movie is progressive. If the movie
is progressive set TimeBase to 23.976fps. If the movie constantly
changes between progressive and interlaced then you're at a crossroads
here. I suggest you read about IVTC before you decide how to go on.
>> Read more about
IVTC
Then go back to the FlaskMpeg options and select the
Audio tab.
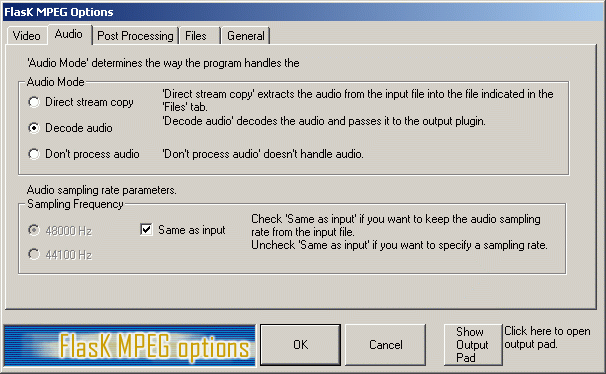 Activate
Decode audio. Uncheck the Same as input box and set the Sampling Frequency
to 44100Hz.
Activate
Decode audio. Uncheck the Same as input box and set the Sampling Frequency
to 44100Hz.
In Post Processing set HQ Bicubic Filtering - set by default - and make sure that No Crop and No letterboxing are checked.
The Files tab will allow you to chose a filename and a location for the output file.
It is up to you whether you prefer to do parts of a movie
or the whole movie at once. There are tools to cut the movie afterwards,
For the moment you have to manually set the encoding
time, otherwise the encoder will encode 300'000 frames no matter how long
the movie is. One way to find out the number of frames is to play the
movie in a DVD player, note the time at the end of the movie and calculate
the number of frames as follows: lengt_in_seconds * framerate = number_of_frame.
The other solution is to load the movie in ReMpeg2 using a streamlist.
However the first line in that streamlist must say "CFFL" in
the first line and nothing else.. the rest is like a normal streamlist.
Press the Open button in the Main windows or ReMPEG2 and select your streamlist.
After a while ReMPEG2 will have finished analyzing the file. The click
on the main tab again and you'll see something like this:
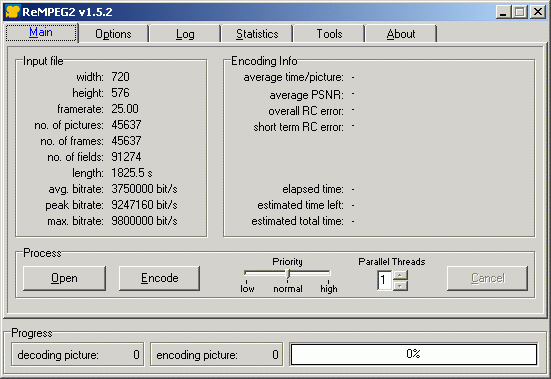 The
no. of frames is what's interesting here... enter that value in
FlaskMpeg's Output Option in the General tab... you'll find the right
place.
The
no. of frames is what's interesting here... enter that value in
FlaskMpeg's Output Option in the General tab... you'll find the right
place.
As you can see this is a 25FPS source and the number of
pictures and frames match. In case of a progressive NTSC source you could
see that those two number actually differ because the movie were 24fps
and the pulldown flag set resulting in 29.97fps.
FlaskMpeg can't frameserve the same frame twice unless you use the special
version found on my site. If you came here to do IVTC then you'll have
to uncheck Keep aspect ratio in the Post Processing options of the FlaskMpeg
MPEG Options (this is the checkbox slightly above and to the left of the
OK button). The IVTC will fail completely if you don't do that. You'll
also have to make sure that you frameserve an unaltered picture, so click
on the Show Output Pad button, and press Reset Settings in the Output
pad. If you don't want to use IVTC in VirtualDub (this is only needed
for the progressive/interlaced sources.. I hope you came here reading
the whole guide so you know what I'm talking about) you can do the cropping
as described in the bitrate and resolution
guide.
The following calculations do only concern miniDVD and SVCD.
How to calculate the bitrate: Bitrates are indicated in KBit/s which means Kilobit per second. Or in other word a movie encoded with bitrate X will use X bits for every second of film. Therefore the final size can be calculated by simply multiplying the bitrate with the movies length in seconds. The formula can of course be turned around, for instance take a CD size, divide it by the bitrate and you'll end up with the number of seconds of film you can place on a CD. Of course, in all these calculations you have to pay attention to 2 things: First the difference between a bit and a byte. Bytes are usually used for CD sizes, whereas bitrates are indicated in bits. A Byte equals 8 bits. Second, you have to add the bitrate of the audio and video when doing these calculations - after all the audio track will also take up some space. Now let's look at a real life example: Assume we have a movie that has a duration of 2:13:15. That makes 2x3600 + 13x60 + 15 = 7995 seconds of film. Let's assume we want to put the movie on 3 CDs. Since we'll burn our movie in mode 2 we have about 700MB per CD, or in total 2100MB. Since one MB equals 1024KB we have 21510300KB or 172082400KBit. Dividing that number by the movies length in seconds yields 2151 KBit/s. Let's say we use 224KBit/s which leaves us 1927KBit/s. If you want to encode at a constant bitrate that is the value you have to enter in the encoding program. Should you decide for variable bitrate, you have to enter this value as the average bitrate. You have to specify 2600KBit/s as maximum bitrate (given by the SVCD specs if you're encoding an SVCD). It's usually good to give a minimum bitrate that still looks okay.. so don't go lower than 1MBit/s in all cases.
Then install AviSynth. You'll have to copy avisynth.dll in the system subfolder in your windows folder. Usually this is c:\windows\system or c:\winnt\system. Then run the install.reg file of the avisynth package. After that copy CM-Avisynth.cm.flask into your FlaskMpeg folder.
Having done all that let's get to business:
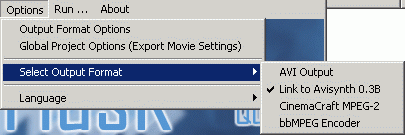 Chose
Link to AviSynth as Output Format. Make sure you've set all the Global
Project Options right then press Run - Start Conversion.
Chose
Link to AviSynth as Output Format. Make sure you've set all the Global
Project Options right then press Run - Start Conversion.
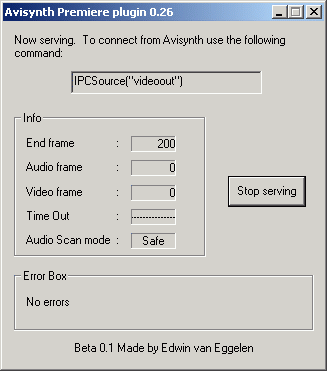 The
following window will pop up after a couple of seconds. Now mark the IPCSource("videoOut")
string with your mouse, press Control-C, open Notepad, press Control-V and
save the file as movie.avs. Make sure it's movie.avs not movie.avs.txt.
In order to do so select File Type : All files (default file type is textfile
(*.txt) and this will result in the file being called movie.avs.txt even
if you enter only movie.avs!!!). You can rename a file in Explorer by right-clicking
on it and select rename then adjust the name. But if you actually had to
read this you're at the wrong place. We're talking about digital video here..
which requires a certain computer knowledge. I suggest you get a good book
on the basics of computers before you go on!
The
following window will pop up after a couple of seconds. Now mark the IPCSource("videoOut")
string with your mouse, press Control-C, open Notepad, press Control-V and
save the file as movie.avs. Make sure it's movie.avs not movie.avs.txt.
In order to do so select File Type : All files (default file type is textfile
(*.txt) and this will result in the file being called movie.avs.txt even
if you enter only movie.avs!!!). You can rename a file in Explorer by right-clicking
on it and select rename then adjust the name. But if you actually had to
read this you're at the wrong place. We're talking about digital video here..
which requires a certain computer knowledge. I suggest you get a good book
on the basics of computers before you go on!
That's all there's is to it. The Avisynth scripts can be much more sophisticated. For more info visit the official homepage.
Now you can start up your favorite encoder and load the avs script as source.